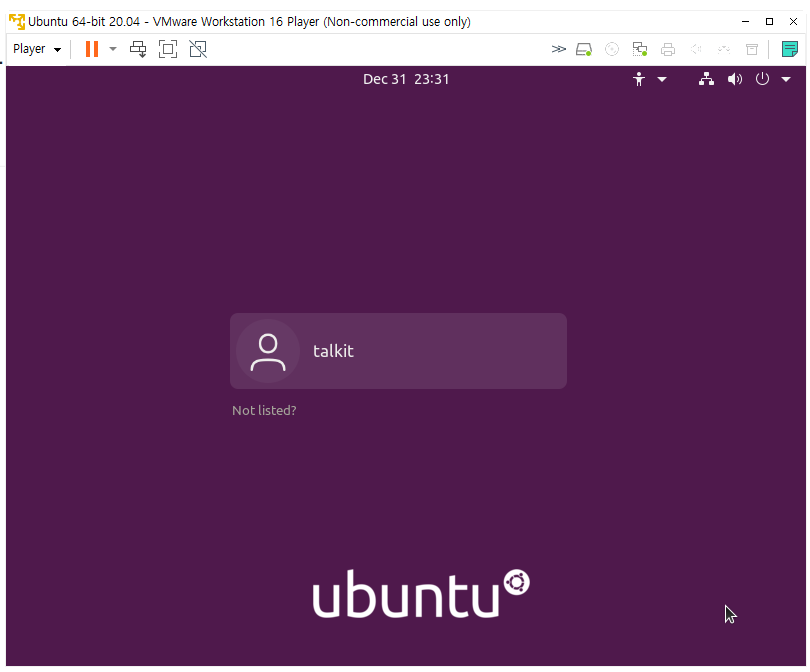
VMWARE 관련 글을 있는데 정작 VMWARE를 설치하는 글은 없는 것 같아서 적어봅니다.
리눅스 이야기를 거의 하고 있지만, 오늘은 윈도우즈 입니다. ^^
개요
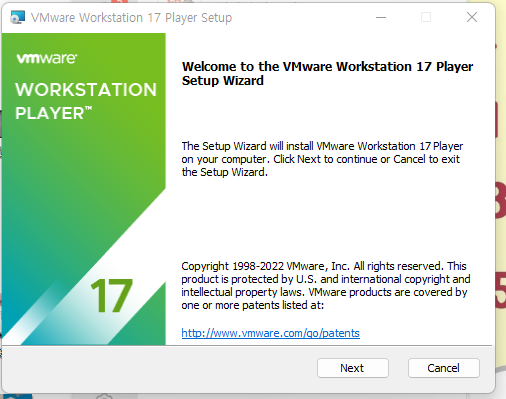
VMWARE는 VMWARE Inc. 에서 개발한 가상화 도구 입니다. 해당 프로그램의 정식 명칭은 VMWARE Workstion Player 입니다. 서버용으로는 Fusion이라는 솔루션이 있고, 웍스테이션용으로 VMWARE Workstation Pro라는 제품이 있습니다. 지금까지 소개한 제품들은 다 유료 입니다. 하지만, VMWARE Workstation Player 개인에 한해서 무료 입니다. 기업에서 사용할때는 돈을 내고 사용하는 제품입니다. 개인적으로 사용하실때는 무료기 때문에 저는 무료로 사용하고 있습니다.
VMWARE외에도 Oracle VirtualHost라는 프로그램도 있습니다.
글을 계속 적게 되면 저 제품도 한번 써보겠습니다. ^^
다운로드
이 화면은 좀 적응이 안되네요 ^^ 영문 홈페이지가 더 편한 것 같습니다.
다운로드는 저기 Workstation Player 를 다운로드할 계획입니다.
무료 다운로드를 클릭 하십시오.
GO TO DOWNLOAD를 클릭하십시오.
Windows 64-bit 오른쪽의 DOWNLOAD NOW를 클릭하십시오.
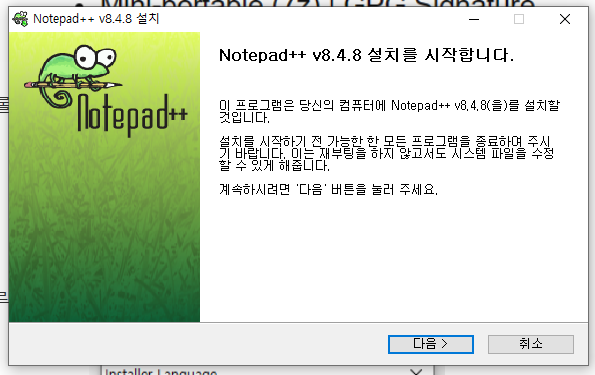
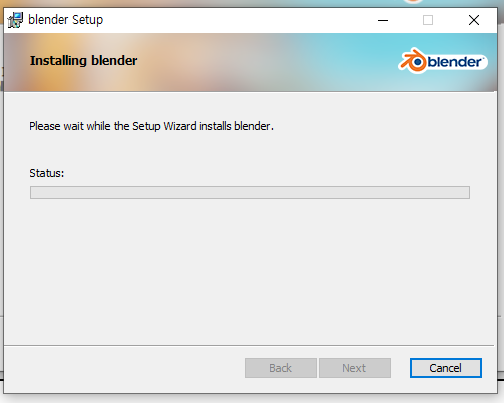
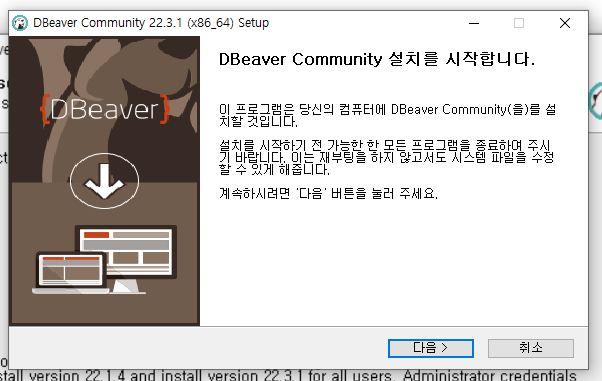
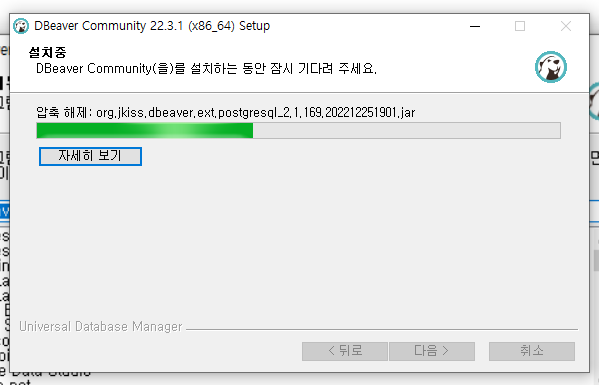
다운로드는 잘 끝났습니다. 이제 설치를 진행 하겠습니다.
설치
제 컴에서는 설치가 안되어서 집에 있는 다른 피씨에서 설치 과정을 보여 드리겠습니다.
윈도우가 늘 그렇듯이 위 파일을 더블 클릭하시면 됩니다.
그러면 인증 화면이 한번 지나갑니다. 그때 Yes 또는 확인을 클릭하십시오.
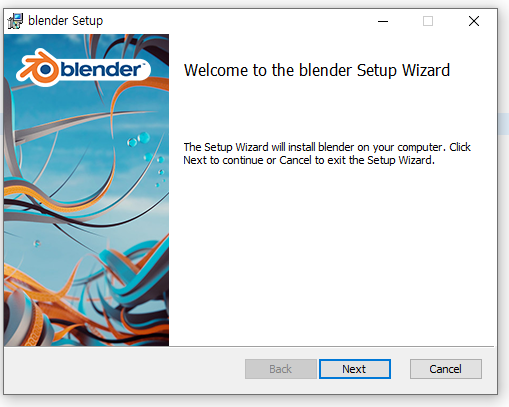
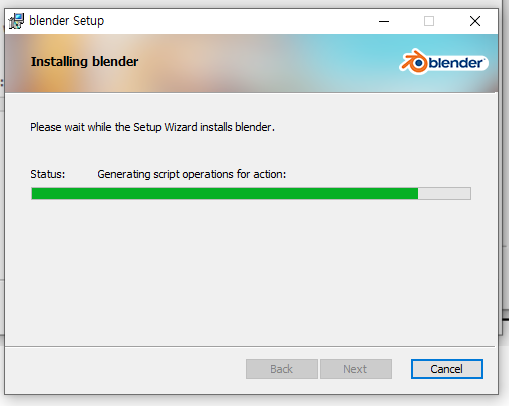
저는 조금 많이 기다리기는 했는데 위와 같이 VMWARE 화면이 나왔습니다.
저기서 Next를 클릭합십시오.
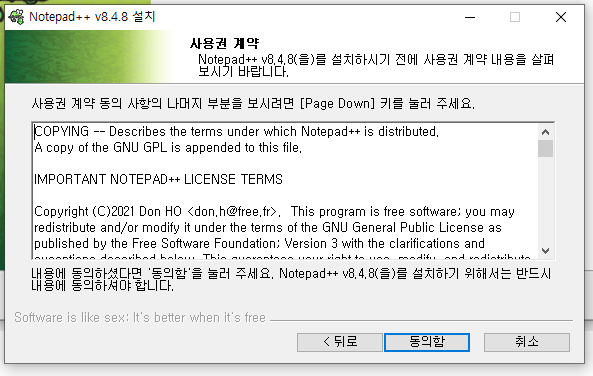
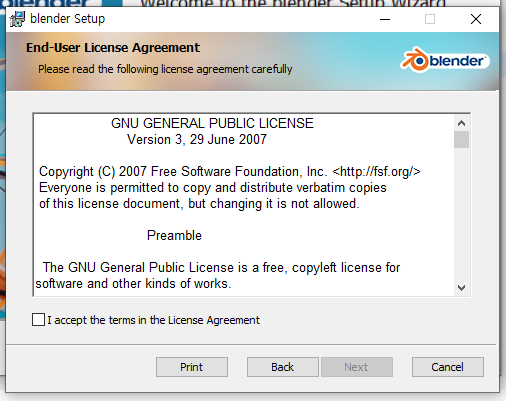
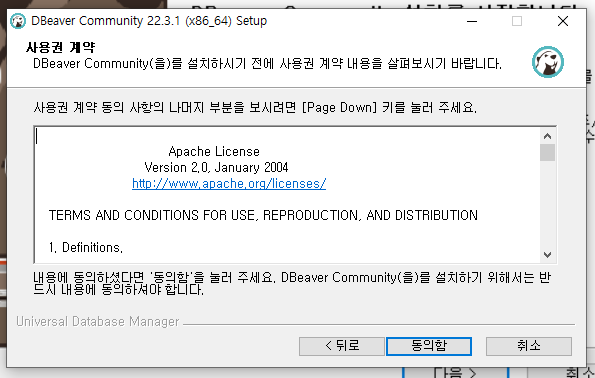
라이센스 동의하시구요. Next를 클릭하시면 됩니다.
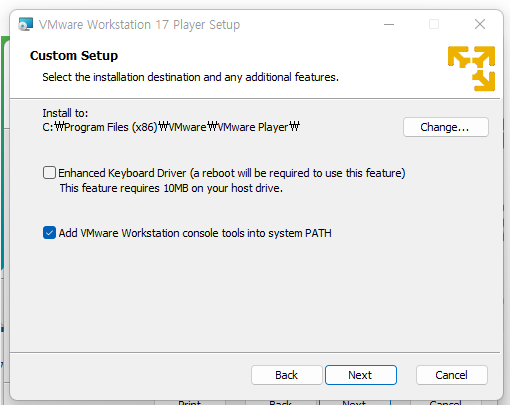
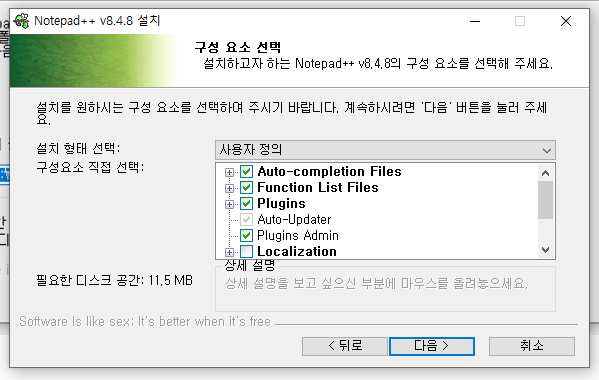
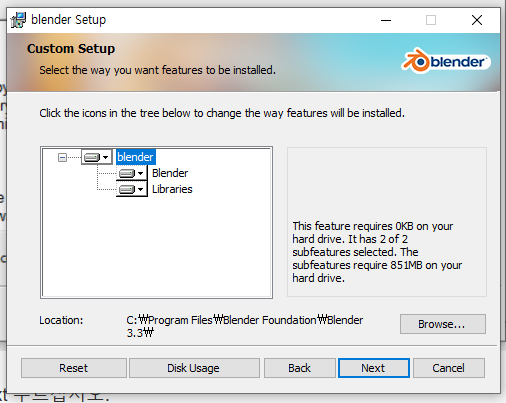
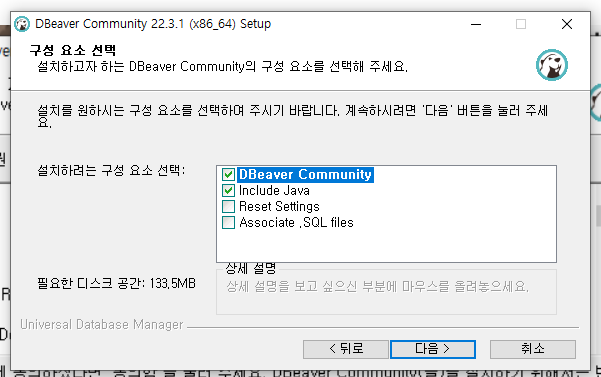
저는 강화된 키보드 드라이버는 설차하지 않습니다만, 필요하시면 설치하시면 됩니다.
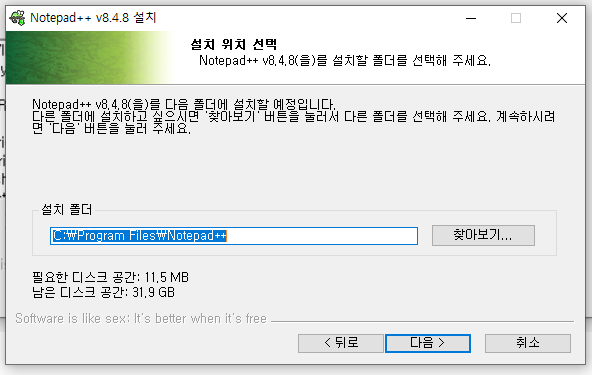
그리고, PATH는 등록해 두는게 좋아서 저대로 Next 합니다.
혹시 설치 위치를 바꾸실 분은 Change를 클릭하셔서 변경 하시면됩니다.
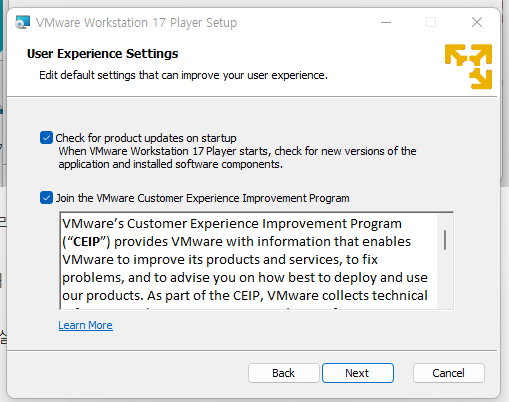
저는 보통 저 두가지를 체크를 해제 합니다. 하나는 VMWARE의 업데이트를 체크할꺼냐? 두번째는 내가 사용한 경험을 VMWARE와 공유할 것인가 입니다. ^^ 저는 체크를 해제 합니다. ^^
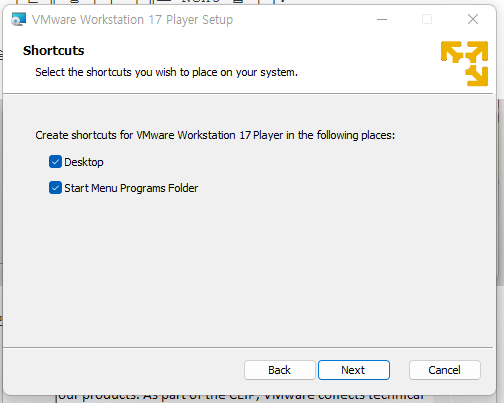
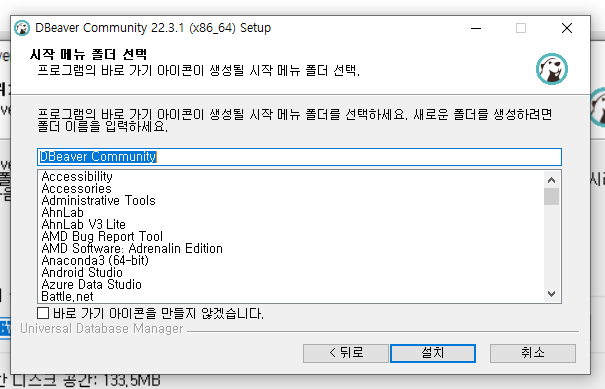
저는 데스크톱에 바로가기를 안만드는 편이라서 Desktop 앞에 체크는 지워는 편입니다.
그래도 두셔도 됩니다. Next
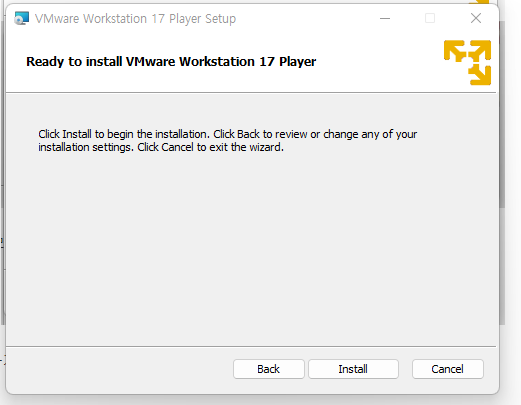
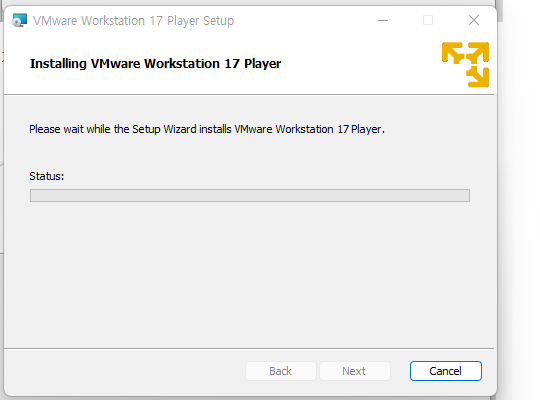
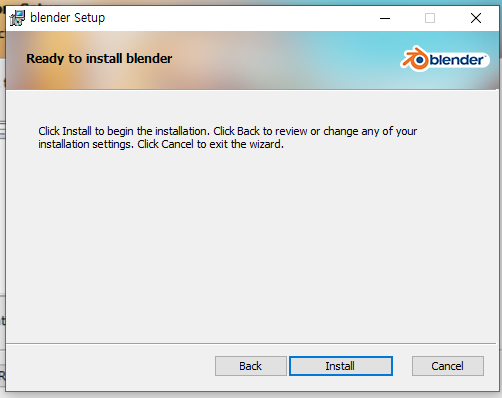
이제 설치를 시작 합니다.
음 중간 중간에 네트워크 드라이버등을 설치하고 뭐 여러가지를 자동으로 진행 합니다.
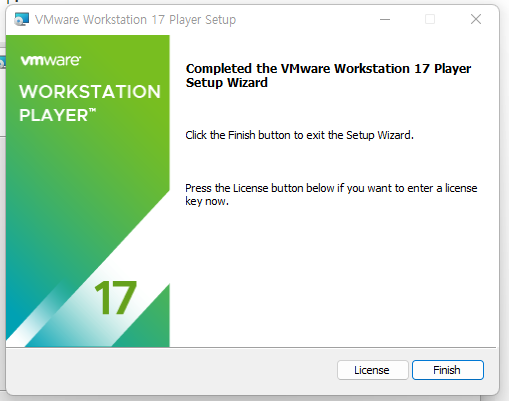
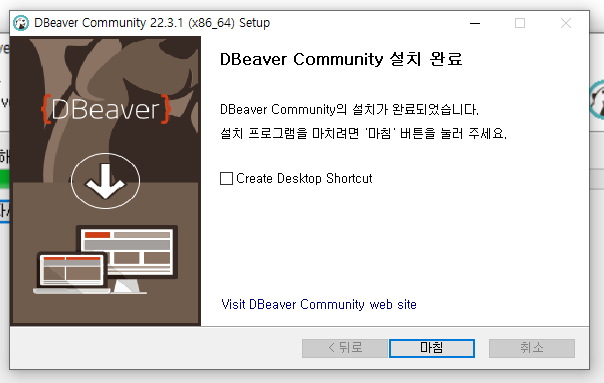
설치가 끝나면 저렇게 나옵니다. Player는 라이센스 등록을 안해도 무료 입니다.
Finish를 클릭하시면 됩니다.
설치 확인
이제 설치는 끝나구요.
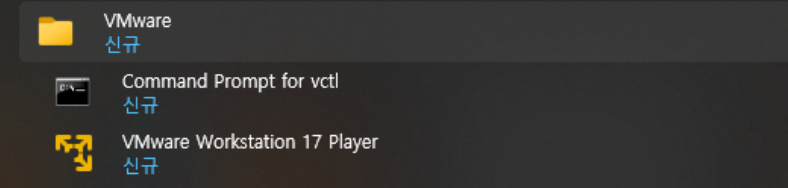
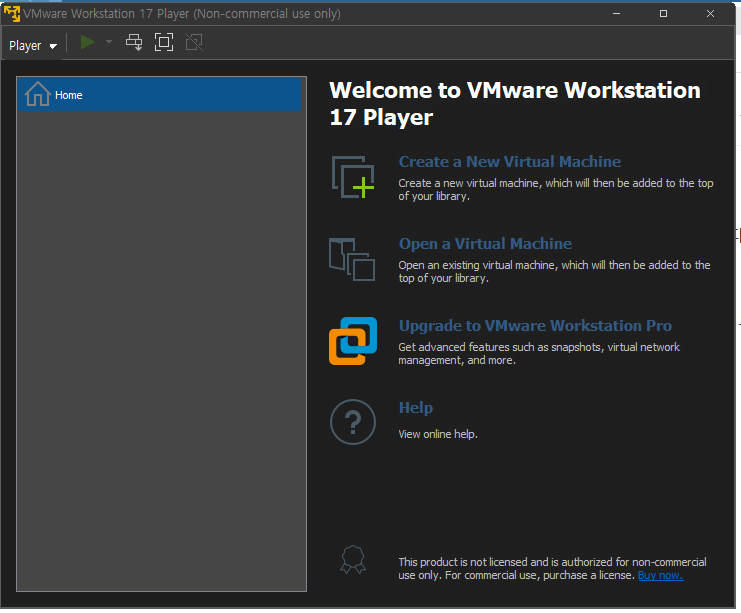
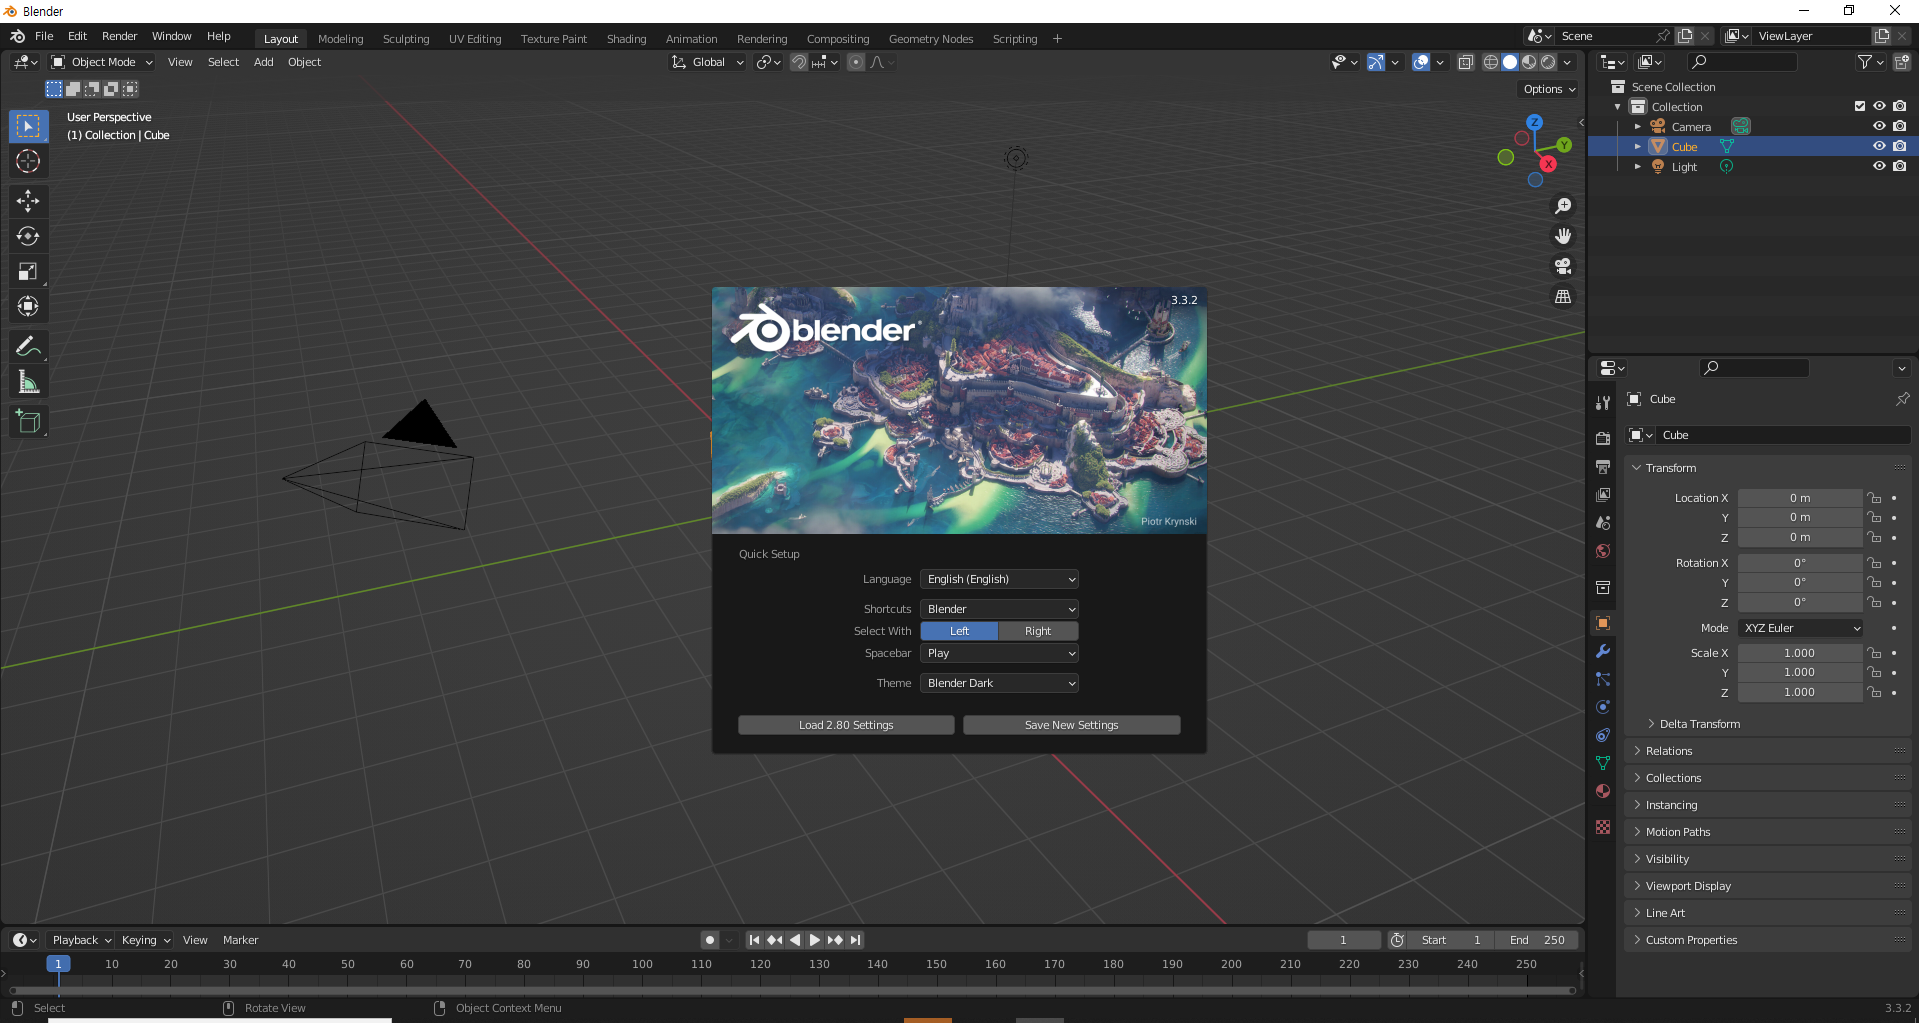
시작 메뉴에서 vmware라고 치시거나, V근처에서 찾으시면 저렇게 VMware 가 있습니다. 거기서 17 Player를 클릭하십시오.
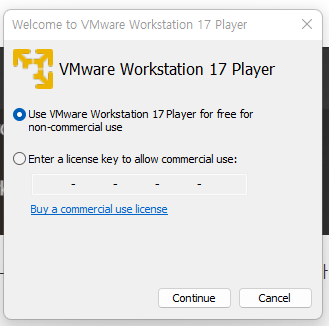
처음 켜시면 위와 같이 나옵니다. 저희는 무료로 사용할 것이기 때문에 non-commercial use를 클릭하시면 됩니다.
그리고 Continue를 클릭하십시오.
이제 라이센스까지 확인이 끝났고 Finish를 눌러시시면 제가 설치할때 보여 드렸던 그 화면이 나옵니다.
요렇게 나옵니다. 여기까지 잘 따라 오셨으면 설치가 잘 된 것입니다.
오늘은 여기 까지이고 ^^ 다음 부터는 또 열심히 VMWARE와 관련된 글들을 작성해 보겠습니다.
감사합니다.
추가 말
제가 설치해 둔 VMWARE는 16.대 입니다. 하지만, 최신 버전을 설치했구요. 메뉴나 이런 부분은 거의 비슷합니다. 제가 쓸때는 17 버전은 다른 컴에 설치해서 이문서를 적었습니다. ^^
아래 관련글들은 16.대에서 진행 한 것이지만, 버전만 변경 되었지 비슷하게 동작 합니다.
FTP options:
       --ftp-user=USER             set ftp user to USER
       --ftp-password=PASS         set ftp password to PASS
       --no-remove-listing         don't remove '.listing' files
       --no-glob                   turn off FTP file name globbing
       --no-passive-ftp            disable the "passive" transfer mode
       --preserve-permissions      preserve remote file permissions
       --retr-symlinks             when recursing, get linked-to files (not dir)
talkit@ubuntu:~$ echo $PATH
/usr/local/sbin:/usr/local/bin:/usr/sbin:/usr/bin:/sbin:/bin:/usr/games:/usr/local/games:/snap/bin
talkit@ubuntu:~$ su -
Password:
su: Authentication failure
talkit@ubuntu:~$ su -
Password:
root@ubuntu:~# echo $PATH
/usr/local/sbin:/usr/local/bin:/usr/sbin:/usr/bin:/sbin:/bin:/usr/games:/usr/local/games:/snap/bin
root@ubuntu:~#
환경 변수 차이가 거의 없습니다. T.T
       -, -l, --login
              Start  the shell as a login shell with an environment similar to
              a real login:

                 o      clears all the environment variables except  TERM  and
                        variables specified by --whitelist-environment

                 o      initializes  the  environment  variables  HOME, SHELL,
                        USER, LOGNAME, and PATH

                 o      changes to the target user's home directory

                 o      sets argv[0] of the shell to '-' in order to make  the
                        shell a login shell
그래서
"-" 옵션을 제가 잘 못 이해 하고 있는 줄 알고 다시 봤는데 비슷하게 이해는 하고 있네요 .
환경 변수중의 일부만 안변하고 변하는 것이고
"-" 옵션을 주면, 실제로 그 계정으로 login한걸로 되네요 ^^
일단 그렇다고 합니다.
root user로 오래 작업을 해야 할 경우 su - 를 이용해서 작업하시는 것이 훨씬 효율적입니다. - 없이 하면 뭔가 권한이 조금 부족한 느낌입니다. ^^
그리고 su - 뒤에 사용자를 붙이면 해당 사용자로 변경 됩니다.
su - 는 실제로 su - root 가 생략 되어 있다고 보시면 됩니다.
비밀번호 없이 해당계정으로 접근 하시려면, root 계정으로 접근 하신 다음에 비밀번호 없는 계정으로 접근 하시면 됩니다.
오 방금 옵시디안에 vim 옵션을 활성화 했는데 좋습니다. ^^ 기보드 화살표 키로 안가도 될네요 ㅎㅎㅎ
실제로 한번 예저를 보여 드리겠습니다.
su - mattermost
Password:
su: Authentication failure
talkit@ubuntu:~$ su - root
Password:
root@ubuntu:~# su - mattermost
su: warning: cannot change directory to /home/mattermost: No such file or directory
$
위에서 보시면, mattermost 계정으로 접근이 안됩니다. 왜냐면 아까 root 처럼 비밀번호가 없습니다. ^^
하지만, root 계정으로 su 한 다음에 mattermost 계정으로 su 하면 해당 계정으로 접근은 가능 합니다.
계정 홈도 지정해주지 않아서 ^^
저렇게 되네요
마지막으로 su -s -
를 알리고 su 관련 내용은 접고 다음에 있는 sudo를 이야기 하겠습니다.
su -s /usr/bin/csh -
위 명령어를 내렸는데 설치가 안되어 있습니다. ^^
그래서 또 설치 합니다.
sudo apt install csh
csh 은 가끔씩 쓸일이 있어서 설치 해 놓으면 좋을 것 같습니다.
talkit@ubuntu:~$ su -s /bin/csh -
Password:
#
이렇게 하시면 계정을 변경할때 기본 쉘을 변경할 수 있습니다.
여기까지가 su에 관련된 내용입니다.
원하는 사용자의 권한 획득 이제 하시겠죠.
sudo 사용법
sudo는 원하는 사용자 권한으로 일하기라고 생각하시면 됩니다.
#
# This file MUST be edited with the 'visudo' command as root.
#
# Please consider adding local content in /etc/sudoers.d/ instead of
# directly modifying this file.
#
# See the man page for details on how to write a sudoers file.
#
Defaults        env_reset
Defaults        mail_badpass
Defaults        secure_path="/usr/local/sbin:/usr/local/bin:/usr/sbin:/usr/bin:/sbin:/bin:/snap/bin"

# Host alias specification

# User alias specification

# Cmnd alias specification

# User privilege specification
root    ALL=(ALL:ALL) ALL

# Members of the admin group may gain root privileges
%admin ALL=(ALL) ALL

# Allow members of group sudo to execute any command
%sudo   ALL=(ALL:ALL) ALL

# See sudoers(5) for more information on "#include" directives:

#includedir /etc/sudoers.d
우선 sudo를 설명 드리려면 sudoers 라는 파일을 알아야 합니다. ^^
%sudo ALL=(ALL:ALL) ALL
위 줄이 중요합니다.
sudo는 저 그룹에 속한 사용자만 가능 합니다.
제 컴퓨터에서 talkit 계정은
vi /etc/group
해서 보시면
sudo:x:27:talkit
sudo 그룹에 포함되어 있습니다
자 그러면, talkit2 계정을 만들겠습니다.
adduser talkit2
일부러 그룹을 안주고 만들었습니다.
저 talkit2에 비밀번호를 주겠습니다.
sudo passwd talkit2
비밀번호를 줬구요
talkit2 계정에 su로 접근 해서 sudo를 한번 해보겠습니다.
첫번째는 실패 합니다.
다시 빠저 나와서 talkit 계정으로
talkit2를 sudo 그룹에 넣습니다.
sudo usermod -aG sudo talkit2
위와 같이 하면 성공합니다.
talkit@ubuntu:~$ su - talkit2
su: user talkit2 does not exist
talkit@ubuntu:~$ adduser talkt2
adduser: Only root may add a user or group to the system.
talkit@ubuntu:~$ sudo adduser talkt2
Adding user `talkt2' ...
Adding new group `talkt2' (1001) ...
Adding new user `talkt2' (1001) with group `talkt2' ...
Creating home directory `/home/talkt2' ...
Copying files from `/etc/skel' ...
New password:
Retype new password:
passwd: password updated successfully
Changing the user information for talkt2
Enter the new value, or press ENTER for the default
        Full Name []:
        Room Number []:
        Work Phone []:
        Home Phone []:
        Other []:
Is the information correct? [Y/n] y
talkit@ubuntu:~$ su - talkit
Password:
talkit@ubuntu:~$ su - talkit2
su: user talkit2 does not exist
talkit@ubuntu:~$ su - talkt2
Password:
su: Authentication failure
talkit@ubuntu:~$ su - talkt2
Password:
su: Authentication failure
talkit@ubuntu:~$ su - talkt2
Password:
talkt2@ubuntu:~$ sudo vi /etc/sudoers
[sudo] password for talkt2:
talkt2 is not in the sudoers file.  This incident will be reported.
talkt2@ubuntu:~$ exit
logout
talkit@ubuntu:~$ sudo usermod -aG sudo talkt2
talkit@ubuntu:~$ su - talkt2
Password:
To run a command as administrator (user "root"), use "sudo <command>".
See "man sudo_root" for details.

talkt2@ubuntu:~$ sudo vi /etc/sudoers
[sudo] password for talkt2:
talkt2@ubuntu:~$ sudo cat /etc/sudoers
#
# This file MUST be edited with the 'visudo' command as root.
#
# Please consider adding local content in /etc/sudoers.d/ instead of
# directly modifying this file.
#
# See the man page for details on how to write a sudoers file.
실제로 해보면 위와 같이 되는데 ^^
제가 실수로 talkt2 으로 계정을 만들었네요. 저거 빼고는 차가 없이 잘 테스트가 되었습니다.
일단 실습을 먼저 했구요.
이 실습의 목적은 사용자를 어떻게 sudo 가능하도록 하느냐 입니다. ^^
이제 실제로 sudo 사용법은 어렵지 않습니다. ^^
sudo [옵션] 원하는명령어 [원하는명령어의 옵션들]
옵션들은 생략이 가능하고 sudo 이다 보니 ^^ 무조건 명령어는 하나 넣으셔야 합니다.
옵션 중에는 -u 옵션만 설명을 드리겠습니다.
다른 설명을 원하시면 ^^
man sudo
설명이 잘 나와 있습니다.
sudo cat /etc/sudoers
 sudo cat /etc/sudoers
#
# This file MUST be edited with the 'visudo' command as root.
#
# Please consider adding local content in /etc/sudoers.d/ instead of
# directly modifying this file.
#
# See the man page for details on how to write a sudoers file.
#
yum이라는 프로그램은 역시 레드햇 리눅스에서 만든 프로그램인데, rpm 보다는 스스로 호환성/의존성 문제를 해결해 줍니다.
그리고 apt는 호환성/의존성 문제가 해결된 데비안/우분투 리눅스의 설치 관리자 입니다.
![[Pasted image 20230106232301.png]]
apt의 GUI 버전을 보여 드리겨고 했는데 ^^ 위와 같이 카달로그를 받는데 시간이 걸리네요
저거 끝나면 다시 캡쳐를 ^^
지금 제가 하고 있는 것은 CLI 입니다. Command LIne Interface ^^
apt 기본 사용법
sudo apt 명령어 [패키지명|검색어]
위와 같습니다.
오늘 설명할 명령어는 아래와 같습니다.
update
upgrade
install
reinstall
remove
search
list
show
위 명령어들을 알아 보겠습니다.
대부분 우분투에 뭔가를 까실때 저 명령어들로 해결이 가능 합니다.
우선 update는 최신 버전의 패키지 서버들과 패키지의 버전 업데이트를 목록을 알려 줍니다.
update 명령어
sudo apt update
우분투에서 root를 활성화 시키지 않는 이상 sudo를 사용해야 합니다.
그래서 위와 같이 사용합니다.
한번 해보겠습니다.
![[Pasted image 20230106232754.png]]
아까 하고 있는 작업 끝나서 보입니다. ^^
위와 같이 GUI형태로 프로그램을 설치하고 관리 할 수 있습니다.
다시 putty로 돌아 와서.
sudo apt update 명령어를 내려 보십시오.
sudo apt update
[sudo] password for talkit:
Hit:1 http://security.ubuntu.com/ubuntu focal-security InRelease
Hit:2 http://us.archive.ubuntu.com/ubuntu focal InRelease
Hit:3 http://us.archive.ubuntu.com/ubuntu focal-updates InRelease
Hit:4 http://us.archive.ubuntu.com/ubuntu focal-backports InRelease
Reading package lists... Done
Building dependency tree
Reading state information... Done
9 packages can be upgraded. Run 'apt list --upgradable' to see them.
sudo apt list | more

WARNING: apt does not have a stable CLI interface. Use with caution in scripts.

Listing...
0ad-data-common/focal,focal 0.0.23.1-1 all
0ad-data/focal,focal 0.0.23.1-1 all
0ad/focal 0.0.23.1-4ubuntu3 amd64
0install-core/focal 2.15.1-1 amd64
0install/focal 2.15.1-1 amd64
0xffff/focal 0.8-1 amd64
2048-qt/focal 0.1.6-2build1 amd64
2ping/focal,focal 4.3-1 all
2to3/focal,focal 3.8.2-0ubuntu2 all
2vcard/focal,focal 0.6-2 all
3270-common/focal 3.6ga4-3build1 amd64
389-ds-base-dev/focal 1.4.3.6-2 amd64
389-ds-base-libs/focal 1.4.3.6-2 amd64
389-ds-base/focal 1.4.3.6-2 amd64
389-ds/focal,focal 1.4.3.6-2 all
3dchess/focal 0.8.1-20 amd64
3depict/focal 0.0.22-1.2build1 amd64
3dldf-doc/focal,focal 2.0.3+ndfsg-4 all
4g8/focal 1.0-3.2 amd64
4pane/focal 6.0-1build1 amd64
4store/focal 1.1.6+20151109-2build2 amd64
4ti2-doc/focal,focal 1.6.9+ds-2build1 all
4ti2/focal 1.6.9+ds-2build1 amd64
64tass/focal 1.54.1900-1 amd64
6tunnel/focal 1:0.13-1 amd64
7kaa-data/focal,focal 2.15.2+dfsg-2build1 all
7kaa/focal 2.15.2+dfsg-2build1 amd64
9base/focal 1:6-7build1 amd64
9menu/focal 1.9-2 amd64
9mount/focal 1.3+hg20170412-1 amd64
9wm/focal 1.4.1-1 amd64
a11y-profile-manager-doc/focal,focal 0.1.11-0ubuntu4 all
a11y-profile-manager-indicator/focal 0.1.11-0ubuntu4 amd64
a11y-profile-manager/focal 0.1.11-0ubuntu4 amd64
a2jmidid/focal 9-2 amd64
a2ps/focal 1:4.14-5 amd64
a56/focal 1.3+dfsg-9 amd64
a7xpg-data/focal-updates,focal-updates 0.11.dfsg1-10build3.1 all
a7xpg/focal-updates 0.11.dfsg1-10build3.1 amd64
aa3d/focal 1.0-8build1 amd64
aac-enc/focal 0.1.6-1 amd64
aajm/focal 0.4-10build1 amd64
aaphoto/focal 0.45-1 amd64
aapt/focal 1:8.1.0+r23-3build2 amd64
abacas/focal,focal 1.3.1-6 all
abcde/focal,focal 2.9.3-1 all
abci/focal 0.0~git20170124.0.f94ae5e-2 amd64
abcm2ps/focal 8.14.6-0.1 amd64
abcmidi/focal 20200122-1 amd64
abe-data/focal,focal 1.1+dfsg-3 all
abe/focal 1.1+dfsg-3 amd64
abgate/focal 1.1.9-2build1 amd64
abi-compliance-checker/focal,focal 2.3-0.2ubuntu1 all
abi-dumper/focal,focal 1.1-1 all
abi-monitor/focal,focal 1.12-2ubuntu1 all
abi-tracker/focal,focal 1.11-1 all
abicheck/focal,focal 1.2-5ubuntu1 all
abigail-doc/focal,focal 1.6-1build1 all
abigail-tools/focal 1.6-1build1 amd64
abisip-find/focal 1.3.0-2 amd64
abiword-common/focal,focal 3.0.2-10 all
위와 같이 설치 되어 있는 캐시되 있는? 설치되고, 설치할 수 있는 모든 패키지들을 보여 주고 있습니다.
sudo apt list --installed
위 명령어를 내리면, 설치 되어 있는 패키지만 찾을 수 있습니다.
지난 번에 제가 설치한 mc 패키지를 한번 찾아 보겠습니다.
sudo apt list --installed | grep mc
위와 같이 하시면 됩니다.
sudo apt list --installed | grep mc

WARNING: apt does not have a stable CLI interface. Use with caution in scripts.

fonts-smc-anjalioldlipi/focal,focal,now 7.1.2-1 all [installed,automatic]
fonts-smc-chilanka/focal,focal,now 1.400-1 all [installed,automatic]
fonts-smc-dyuthi/focal,focal,now 3.0.2-1 all [installed,automatic]
fonts-smc-gayathri/focal,focal,now 1.100-1 all [installed,automatic]
fonts-smc-karumbi/focal,focal,now 1.1.2-1 all [installed,automatic]
fonts-smc-keraleeyam/focal,focal,now 3.0.2-1 all [installed,automatic]
fonts-smc-manjari/focal,focal,now 1.710-1 all [installed,automatic]
fonts-smc-meera/focal,focal,now 7.0.3-1 all [installed,automatic]
fonts-smc-rachana/focal,focal,now 7.0.2-1 all [installed,automatic]
fonts-smc-raghumalayalamsans/focal,focal,now 2.2.1-1 all [installed,automatic]
fonts-smc-suruma/focal,focal,now 3.2.3-1 all [installed,automatic]
fonts-smc-uroob/focal,focal,now 2.0.2-1 all [installed,automatic]
fonts-smc/focal,focal,now 1:7.1 all [installed,automatic]
libxdmcp6/focal,now 1:1.1.3-0ubuntu1 amd64 [installed,automatic]
libxvmc1/focal,now 2:1.0.12-2 amd64 [installed,automatic]
mc-data/focal,focal,now 3:4.8.24-2ubuntu1 all [installed,automatic]
mc/focal,now 3:4.8.24-2ubuntu1 amd64 [installed]
pcmciautils/focal,now 018-11 amd64 [installed,automatic]
결과는 위와 같이 나오구요. 실제로 밑에서 두번째 줄에 있는 아이가 mc 입니다 ^^
그럼 다시 돌아가서
upgrade 명령어
업그레이드 가능한 목록을 알아 봤으니 upgrade를 해보겠습니다.
sudo apt upgrade
명령어는 위와 같습니다.
위 명령어를 내리면 알아서 인터넷에서 받아와서 업그레이드를 진행 합니다. ^^
꺼꾸로 이긴 한데 ^^
upgrade 까지 배웠으니
install 명령어
install을 알아 보겠습니다.
sudo apt install 원하는패키지명
위와 같이 설치 합니다.
음 제가 설치 해둔 리눅스는 컴파일러가 없습니다.
그래서 gcc를 한번 설치 해보겠습니다.
sudo apt install gcc
설치 하기 전에 gcc 엔터를 쳤습니다.
gcc

Command 'gcc' not found, but can be installed with:

sudo apt install gcc
설치 후에 gcc 엔터를 쳤습니다.
gcc
gcc: fatal error: no input files
compilation terminated.
앞에는 프로그램이 없으니 설치 하라고 하고 뒤에는 C파일이 없다고 C파일하나를 내놓으라고 합니다. ^^
설치가 잘 되었씁니다.
remove 명령어
설치가 있으면 삭제가 있습니다. ^^
remove 는 아래와 같습니다.
sudo apt remove gcc
위와 같이 하시면 됩니다.
sudo apt remove gcc
Reading package lists... Done
Building dependency tree
Reading state information... Done
The following packages will be REMOVED:
  gcc
0 upgraded, 0 newly installed, 1 to remove and 0 not upgraded.
After this operation, 51.2 kB disk space will be freed.
Do you want to continue? [Y/n] y
perl: warning: Setting locale failed.
perl: warning: Please check that your locale settings:
        LANGUAGE = (unset),
        LC_ALL = (unset),
        LANG = "ko_KR.UTF-8"
    are supported and installed on your system.
perl: warning: Falling back to the standard locale ("C").
locale: Cannot set LC_CTYPE to default locale: No such file or directory
locale: Cannot set LC_MESSAGES to default locale: No such file or directory
locale: Cannot set LC_ALL to default locale: No such file or directory
(Reading database ... 166383 files and directories currently installed.)
Removing gcc (4:9.3.0-1ubuntu2) ...
Processing triggers for man-db (2.9.1-1) ...
실행을 해보면 잘 지워 집니다.
gcc
-bash: /usr/bin/gcc: No such file or directory
다시 아까 처럼 gcc를 쳐봤는데 그렇게 친절 하지는 않네요 ^^
여튼 삭제가 되었습니다.
reinstall 명령어
sudo apt reinstall 패키지명
gcc를 reinstall 해보겠습니다.
sudo apt reinstall gcc
reinstall은 설치할지를 안묻고 바로 설치 해버리네요 ^^
isntall만 사용하셔도 될 것 같습니다.
search 명령어
search 명령어는 설치할 패키지가 있는지 알려 줍니다.
요즘 관심 가지고 있는 obsidian 이 있는지 찾아 보도록 하겠습니다.
apt search obsidian
apt search obsidian*
Sorting... Done
Full Text Search... Done
minetest-mod-nether/focal,focal 2-4 all
  Minetest mod - Nether portals and materials

obsidian-icon-theme/focal,focal 3.5-1 all
  Intuitive Faenza-like icon theme
결과는 위와 같이 나왔습니다.
음 실제 프로그램은 없는 건가요?
일단 한번 리눅스에 옵시디안 설치하는 방법도 글을 한번 써봐야 겠습니다.
show 명령어
이제 마지막으로 show에 대해서 이야기 해보겠습니다.
sudo apt show 패키지명
위와 같이 사용할 수 있습니다.
mc를 한번 show로 보겠습니다.
sudo apt show mc
[sudo] password for talkit:
Package: mc
Version: 3:4.8.24-2ubuntu1
Priority: optional
Section: universe/utils
Origin: Ubuntu
Maintainer: Ubuntu Developers <ubuntu-devel-discuss@lists.ubuntu.com>
Original-Maintainer: Dmitry Smirnov <onlyjob@debian.org>
Bugs: https://bugs.launchpad.net/ubuntu/+filebug
Installed-Size: 1501 kB
Provides: mcedit
Depends: libc6 (>= 2.15), libext2fs2 (>= 1.37), libglib2.0-0 (>= 2.59.2), libgpm2 (>= 1.20.7), libslang2 (>= 2.2.4), libssh2-1 (>= 1.2.8), mc-data (= 3:4.8.24-2ubuntu1)
Recommends: mime-support, perl, unzip
Suggests: arj, bzip2, catdvi | texlive-binaries, dbview, djvulibre-bin, epub-utils, file, genisoimage, gv, imagemagick, libaspell-dev, links | w3m | lynx, odt2txt, poppler-utils, python, python-boto, python-tz, xpdf | pdf-viewer, zip
Homepage: https://www.midnight-commander.org
Download-Size: 477 kB
APT-Manual-Installed: yes
APT-Sources: http://us.archive.ubuntu.com/ubuntu focal/universe amd64 Packages
Description: Midnight Commander - a powerful file manager
 GNU Midnight Commander is a text-mode full-screen file manager. It
 uses a two panel interface and a subshell for command execution. It
 includes an internal editor with syntax highlighting and an internal
 viewer with support for binary files. Also included is Virtual
 Filesystem (VFS), that allows files on remote systems (e.g. FTP, SSH
 servers) and files inside archives to be manipulated like real files.
정말 멋진 툴이네요 ^^
여기까지가 apt의 기본 사용법입니다.
제가 매일 그냥 사용하고 있고 저도 솔직히 REDHAT계열에서 넘어와서 apt 보다는 yum 이 익숙한데 ^^
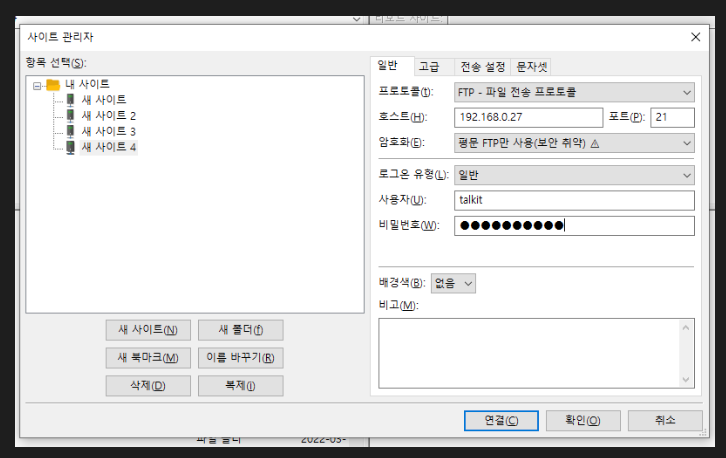
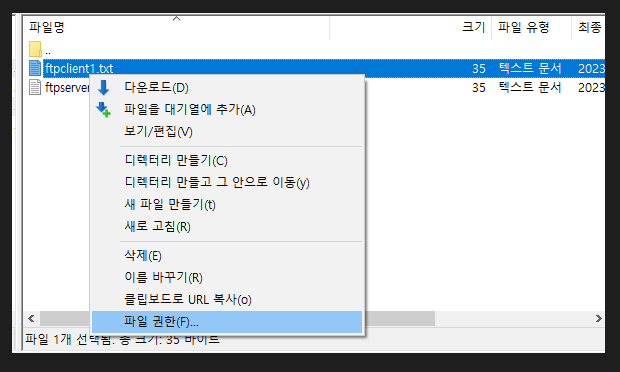
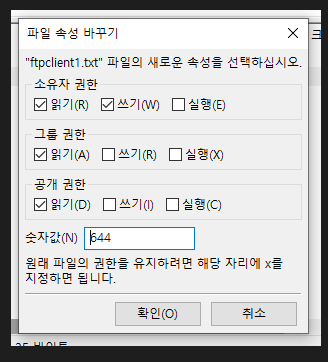
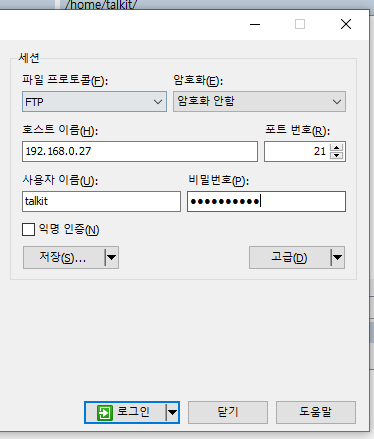
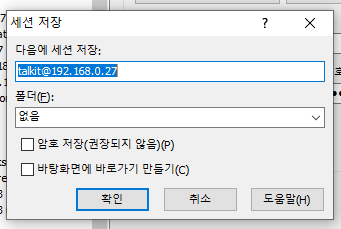
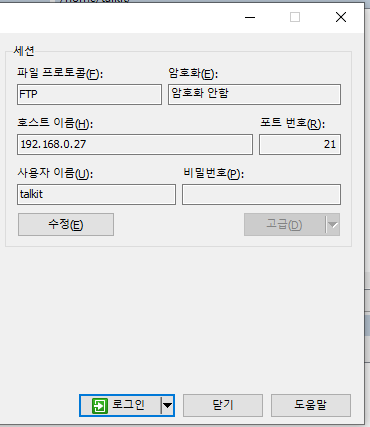
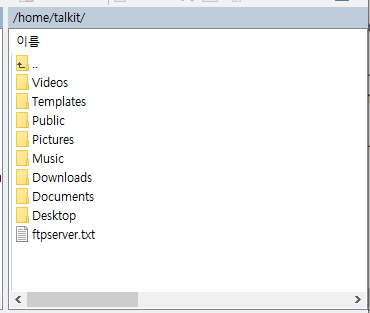
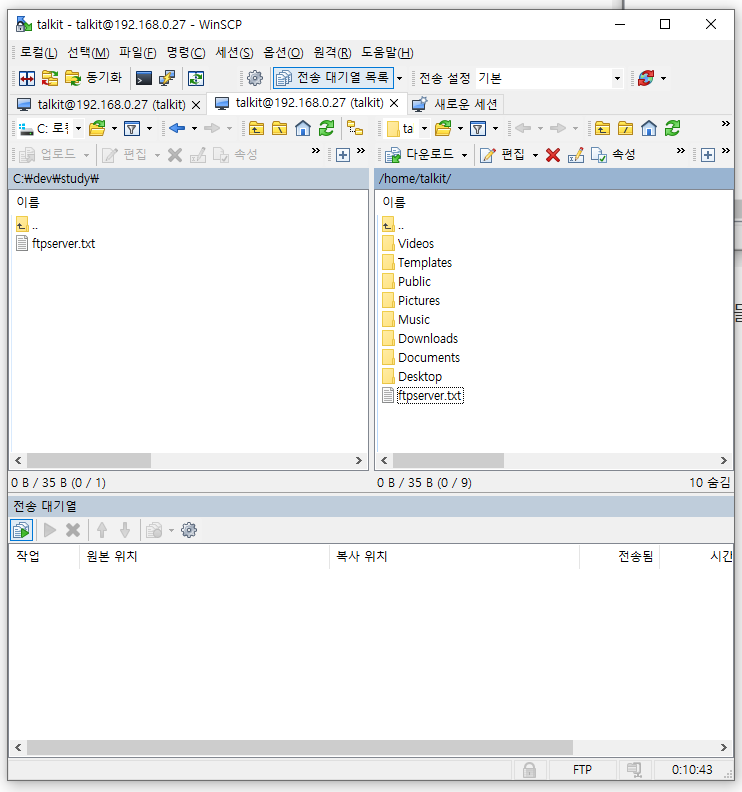
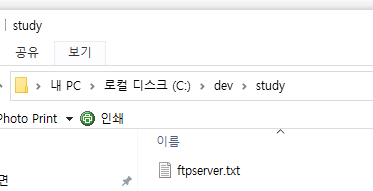
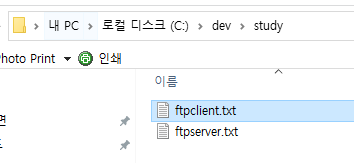
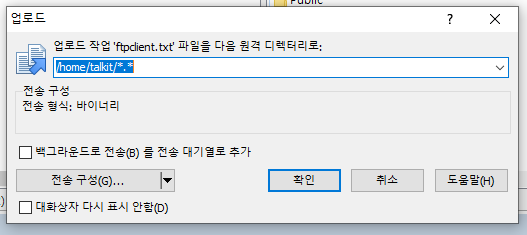
저렇게 개인적으로 설치를 하지 않더라도, 카페24나 Oracle VPS 같은 곳에 FTP가 있다면 다음 정보들이 있어야 합니다.
 접속 주소 : 아이피 또는 도메인
 접속 포트 : 일반적으로 FTP 21, SCP는 22 지만, 서버 보안을 위해서 변경하는 경우 해당 포트
 TLS 여부 : 시스템 관리자로 부터 해당 서버가 보안 접속을 사용하는지를 안내 받으십시오.
 아이디 : 시스템 관리자부터 발급 받으시고,
 비밀번호 : 시스템 관리자로 부터 발급 받습니다. ^^
[Unit]
Description=MinIO
Documentation=https://docs.min.io
Wants=network-online.target
After=network-online.target
AssertFileIsExecutable=/usr/local/bin/minio

[Service]
WorkingDirectory=/usr/local

User=minio-user
Group=minio-user
ProtectProc=invisible

EnvironmentFile=-/etc/default/minio
ExecStartPre=/bin/bash -c "if [ -z \"${MINIO_VOLUMES}\" ]; then echo \"Variable MINIO_VOLUMES not set in /etc/default/minio\"; exit 1; fi"
ExecStart=/usr/local/bin/minio server $MINIO_OPTS $MINIO_VOLUMES

# Let systemd restart this service always
Restart=always

# Specifies the maximum file descriptor number that can be opened by this process
LimitNOFILE=1048576

# Specifies the maximum number of threads this process can create
TasksMax=infinity

# Disable timeout logic and wait until process is stopped
TimeoutStopSec=infinity
SendSIGKILL=no

[Install]
WantedBy=multi-user.target

# Built for ${project.name}-${project.version} (${project.name})
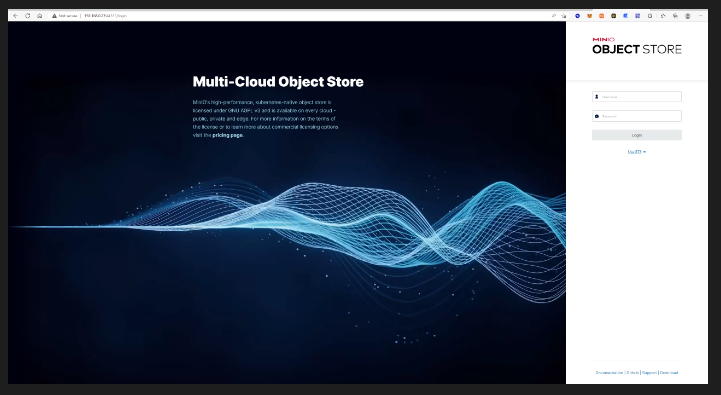
자동으로 설치된 min는 저기 보시다 싶이 minio-user에 의해서 동작하고 있습니다.
저희는 싱글로 설치 할꺼라서 ^^ 계속 이문서를 따라 하겠습니다.
sudo vi /etc/default/minio
저기에 기본 설정 파일이 있다고 합니다.
한번 보겠습니다.
실제로 없네요 ㅋㅋㅋ
# MINIO_ROOT_USER and MINIO_ROOT_PASSWORD sets the root account for the MinIO server.
# This user has unrestricted permissions to perform S3 and administrative API operations on any resource in the deployment.
# Omit to use the default values 'minioadmin:minioadmin'.
# MinIO recommends setting non-default values as a best practice, regardless of environment

MINIO_ROOT_USER=myminioadmin
MINIO_ROOT_PASSWORD=minio-secret-key-change-me

# MINIO_VOLUMES sets the storage volume or path to use for the MinIO server.

MINIO_VOLUMES="/mnt/data"

# MINIO_SERVER_URL sets the hostname of the local machine for use with the MinIO Server
# MinIO assumes your network control plane can correctly resolve this hostname to the local machine

# Uncomment the following line and replace the value with the correct hostname for the local machine.

#MINIO_SERVER_URL="http://minio.example.net"
저도 보안 권고를 받을때 amdin 이런 단순한 아이디를 사용하지 않아야 한다고 보안 권고를 받는 경우가 많아서요.
여기 문서에서도 기본 말고 다른것으로 사용하랍니다.
저는 제가 변경 했습니다.
여러분도 여러분이 원하는 아이디 비밀번호로 변경 하십시오.
변경 했으면 한 번 켜 보겠습니다.
sudo systemctl start minio.service
sudo systemctl status minio.service
● minio.service - MinIO
     Loaded: loaded (/etc/systemd/system/minio.service; disabled; vendor preset: enabled)
     Active: active (running) since Thu 2023-01-05 04:07:06 PST; 8s ago
       Docs: https://docs.min.io
    Process: 3057 ExecStartPre=/bin/bash -c if [ -z "${MINIO_VOLUMES}" ]; then echo "Variable MINIO_VOLUMES not set in /etc/default/minio"; exit 1; fi (code=exited, status=0/SUCCESS)
   Main PID: 3058 (minio)
      Tasks: 21
     Memory: 88.8M
     CGroup: /system.slice/minio.service
             └─3058 /usr/local/bin/minio server /mnt/data

Jan 05 04:07:06 ubuntu minio[3058]: WARNING: Host local has more than 0 drives of set. A host failure will result in data becoming unavailable.
Jan 05 04:07:06 ubuntu minio[3058]: Warning: Default parity set to 0. This can lead to data loss.
Jan 05 04:07:06 ubuntu minio[3058]: MinIO Object Storage Server
Jan 05 04:07:06 ubuntu minio[3058]: Copyright: 2015-2023 MinIO, Inc.
Jan 05 04:07:06 ubuntu minio[3058]: License: GNU AGPLv3 <https://www.gnu.org/licenses/agpl-3.0.html>
Jan 05 04:07:06 ubuntu minio[3058]: Version: RELEASE.2023-01-02T09-40-09Z (go1.19.4 linux/amd64)
Jan 05 04:07:06 ubuntu minio[3058]: Status:         1 Online, 0 Offline.
Jan 05 04:07:06 ubuntu minio[3058]: API: http://192.168.0.27:9000  http://127.0.0.1:9000
Jan 05 04:07:06 ubuntu minio[3058]: Console: http://192.168.0.27:44313 http://127.0.0.1:44313
Jan 05 04:07:06 ubuntu minio[3058]: Documentation: https://min.io/docs/minio/linux/index.html
상태를 확인 해봤는데 잘 켜진 것 같습니다.
journalctl -f -u minio.service
-- Logs begin at Sun 2022-12-25 00:14:58 PST. --
Jan 05 04:07:06 ubuntu minio[3058]: WARNING: Host local has more than 0 drives of set. A host failure will result in data becoming unavailable.
Jan 05 04:07:06 ubuntu minio[3058]: Warning: Default parity set to 0. This can lead to data loss.
Jan 05 04:07:06 ubuntu minio[3058]: MinIO Object Storage Server
Jan 05 04:07:06 ubuntu minio[3058]: Copyright: 2015-2023 MinIO, Inc.
Jan 05 04:07:06 ubuntu minio[3058]: License: GNU AGPLv3 <https://www.gnu.org/licenses/agpl-3.0.html>
Jan 05 04:07:06 ubuntu minio[3058]: Version: RELEASE.2023-01-02T09-40-09Z (go1.19.4 linux/amd64)
Jan 05 04:07:06 ubuntu minio[3058]: Status:         1 Online, 0 Offline.
Jan 05 04:07:06 ubuntu minio[3058]: API: http://192.168.0.27:9000  http://127.0.0.1:9000
Jan 05 04:07:06 ubuntu minio[3058]: Console: http://192.168.0.27:44313 http://127.0.0.1:44313
Jan 05 04:07:06 ubuntu minio[3058]: Documentation: https://min.io/docs/minio/linux/index.html
오 journalctl -f -u minio.service 명령어로 확인 하니깐 뭔가 나오네요 ^^
하지만, 제가 가장 많이 접하고, 사용했던 리눅스는 빨간모자 즉, RedHat 계열의 리눅스 들입니다.
RHEL이라고 레드햇 엔터프라이즈 리눅스, Fedora라고 페도라리눅스, RHEL이 상용화되면서, CentOS라는 리눅스까지 모두 Redhat 계열의 리눅스 입니다. 참 써보지는 않았지만, Oracle Linux도 RedHat 계열로 알고 있습니다.
왜 이야기를 드리느냐? 그 이유는 CentOS가 원래 본연의 목적을 더이상 진행하지 않기 때문입니다.
그래서 저도 고민을 했습니다. 그냥 CentOS를 쓸것인가? 우분투로 갈것인가? 하지난 아직 실제로 사용하고 있는 상용 서버는 CentOS를 사용하고 있습니다. ^^ 제 개인적으로 사용하는 서버들은 Ubuntu를 사용하고 있습니다. 아참 제가 다니는 회사가 과학회사인데 T.T 저는 문과 입니다. ^^ 과학용으로는 또 Fedora도 가끔 사용합니다. ^^
Ubuntu외에 알고는 있었지만, 또하나의 대안이 있어서 소개해 드립니다. 오늘은 소개해 드리고 ^^ 다른 글에서 VMWARE 에 한번 설치해보겠습니다. ^^
이 배포판의 목적은 대놓고 적고 있습니다. RHEL의 커뮤니티 판이라구요. 즉 RHEL을 무료로 사용할 수 있다는 겁니다.
CentOS는 조금간 EOS(서비스 종료)될 예정입니다. 그리고 CentOS Stream 이라고, RHEL의 테스트 버전으로 남게 됩니다.
참 리눅스는 Open Source여서 개발을 하게 되면 일부 소스를 제외하고는 모두 공개하게 되어 있습니다. 그래서 가능한 것이 커뮤니티 버전 입니다. ^^ 소스가 공개 되어 있으니, 컴파일을 해서 다시 배포판을 만들면, 그 배포판에 배포판 만드신 분이 뻘짓만 안하면 ^^ 정말 괜찮은 방법입니다. ^^
로고 바꾸고 서비스 URL정도를 바꾸고, 계속 패치 해주고 얼마나 좋습니까 ^^
아참 제목에는 있지만, 새로운 리눅스의 이름을 본문에는 하나도 안적었네요 신기 합니다. ^^
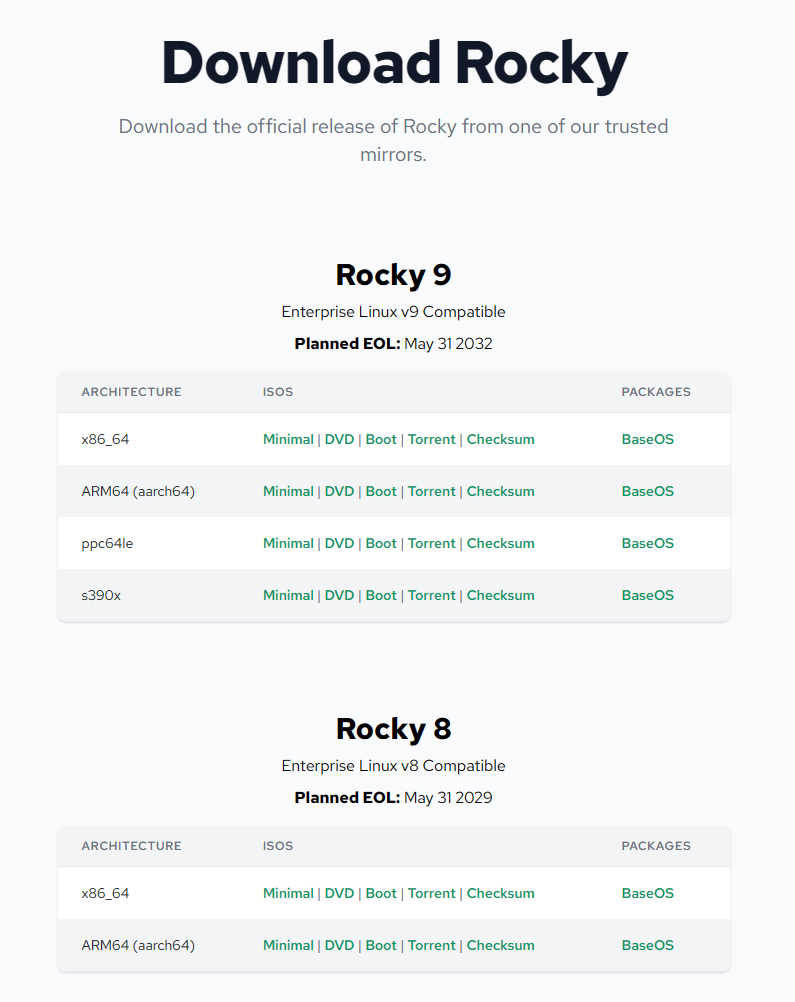
리눅스의 이름의 로키(Rocky)리눅스입니다. CentOS의 원래 창시자 이름중 하나라고 되어 있씁니다. ^^
다운로드 페이지는 저렇게 생겼습니다. ^^
저기서 잘 봐두셔야 할 부분은 Planned EOL: 입니다. 2029년까지네요 정말 깁니다. ^^
그래서 조금 찾아 봤습니다.
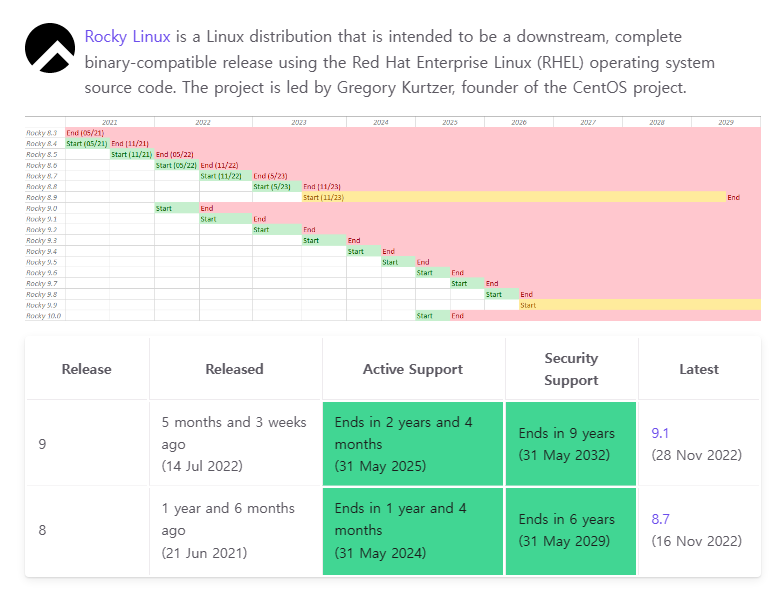
EOL 이 End of Life네요 T.T
Active Support는 리눅스내의 패키지 업데이트를 이양 합니다. 8 버전대는 2024년 5월 31일까지네요. 저기 위에 있었는 EOL은 Security Support가 2029년 5월 31일에 끝나네요.
리눅스/Linux vi/vim NIX에서 가장 유명한 텍스트 편집기 - 글쓰기. One of the best text editor on NIX fields. - Writing https://talkit.tistory.com/699
오늘은 위글들 다음으로 쓰는 글입니다. 잠시 또 다른 길로 샜다가 왔습니다. ^^
끌쓰기는 익히셨다면 ^^
대한민국
동해물
백두산
한라산
백록담
천지
서울
대전
대구
부산
하늘
땅
검은색
우리나라
강산
아리앙
Apple
a
an
the
Korea
Republic of Korea
Internet
What is this
english
korean
Guten Tak
Guten Morgan
Guten Abent
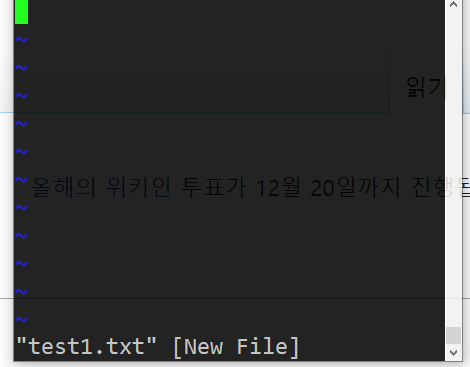
문서 줄 수 30줄
지난 번에는 새로운 문서를 입력하는 법을 알려 드렸습니다.
이제는 글자를 지우고 문장을 지우고 문장을 입력하는 등의 일을 해보겠습니다.
자 위 파일을 우리는 testtext.txt 로 저장 하겠습니다.
이제 제가 말씀을 안드려서 저 문서를 그대로 vi 편집기에 옮길 수 있으시죠 ^^
그리고, <Esc> :wq 를 용해서 저장하고 빠저 나온 다음에 다음 작업을 또 시작 하겠습니다.
vi testtext.txt
위명령어를 이용해서 문서를 만들고 다시 문서를 여셨나요?
저는 여셨다고 보고 ^^
실제로 제가 30줄의 단어를 나열 했는지 확인 해보겠습니다.
<Esc> 누르시고, :set nu
명령어를 입력해 주십시오
      1 대한민국
      2 동해물
      3 백두산
      4 한라산
      5 백록담
      6 천지
      7 서울
      8 대전
      9 대구
     10 부산
     11 하늘
     12 땅
     13 검은색
     14 우리나라
     15 강산
     16 아리앙
     17 Apple
     18 a
     19 an
     20 the
     21 Korea
     22 Republic of Korea
     23 Internet
     24 What is this
     25 english
     26 korean
     27 Guten Tak
     28 Guten Morgan
     29 Guten Abent
     30 문서 줄 수 30줄
이렇게 나오면 합격 ^^
자 이제 첫번째 줄을 지워 보겠습니다.
12번째 줄을 지워보겠습니다. ^^
그러면 이제 또 <Esc> 누르시고, :12 엔터 치십시오
그러면 커서가 12번째 줄로 이동할껍니다.
그자리에서 역시 숙달 되시면 안해도 되겠지만, 가끔 다른 키를 누르시고, 안된다는 분들이 있어서 ^^ <Esc> 한번더 누르시고, dd를 누르십시오.
      1 대한민국
      2 동해물
      3 백두산
      4 한라산
      5 백록담
      6 천지
      7 서울
      8 대전
      9 대구
     10 부산
     11 하늘
     12 검은색
     13 우리나라
     14 강산
     15 아리앙
     16 Apple
     17 a
     18 an
     19 the
     20 Korea
     21 Republic of Korea
     22 Internet
     23 What is this
     24 english
     25 korean
     26 Guten Tak
     27 Guten Morgan
     28 Guten Abent
     29 문서 줄 수 30줄
줄 지우기 입니다.
그런데 지운게 실수다 우리에게 중요한 Undo 신이 ^^ vi에도 있습니다.
소문자 u를 누르십시오.
      1 대한민국
      2 동해물
      3 백두산
      4 한라산
      5 백록담
      6 천지
      7 서울
      8 대전
      9 대구
     10 부산
     11 하늘
     12 땅
     13 검은색
     14 우리나라
     15 강산
     16 아리앙
     17 Apple
     18 a
     19 an
     20 the
     21 Korea
     22 Republic of Korea
     23 Internet
     24 What is this
     25 english
     26 korean
     27 Guten Tak
     28 Guten Morgan
     29 Guten Abent
     30 문서 줄 수 30줄
자 12번째 줄인 땅이 복구 되었습니다. ^^
조심해야 할 것 같습니다. T.T Undo를 한번만 제공하는 것 같네요 ^^
자 그럼 글자를 지워 보겠습니다. 24번째 줄에 What를 지워보도록 하겠습니다.
이번에는 : 누르고 숫자 누르십시오 ^^
그리고 24번째 줄로 커서가 이동했으면 W 위에 커서를 놓으시고, 아시죠 hjkl 을 이용해서 ^^ 잘 조정하시기를
대문자 W 앞에서 소문자 x를 글자수만큼 누릅니다. What는 4글자니까 4번만 누르겠습니다. 띄워쓰기도 지우려면 다섯번 누르셔도 됩니다.
      1 대한민국
      2 동해물
      3 백두산
      4 한라산
      5 백록담
      6 천지
      7 서울
      8 대전
      9 대구
     10 부산
     11 하늘
     12 땅
     13 검은색
     14 우리나라
     15 강산
     16 아리앙
     17 Apple
     18 a
     19 an
     20 the
     21 Korea
     22 Republic of Korea
     23 Internet
     24  is this
     25 english
     26 korean
     27 Guten Tak
     28 Guten Morgan
     29 Guten Abent
     30 문서 줄 수 30줄
잘 따라 하셨으면 위와 같이 되었을 겁니다. ^^
is 앞에다가 커서 놓으시고, i를 누르셔서 What을 복원 하십시오.
What라고 치시면 됩니다. ^^
그러면 다시 복원이 되었을 것 같습니다.
그런데 그러면 dd를 내가 지우고 싶은게 지워 질때가지 쳐야 하나요?
아닙니다. 3dd 라고 입력해 볼껍니다.
위치는 사과를 없애 보겠습니다. Apple죠
마찬가지로 : 번호 누르셔서 잘 따라 오십시오.
17라인에 오셨으면 잘 따라해보십시오. 3dd
      1 대한민국
      2 동해물
      3 백두산
      4 한라산
      5 백록담
      6 천지
      7 서울
      8 대전
      9 대구
     10 부산
     11 하늘
     12 땅
     13 검은색
     14 우리나라
     15 강산
     16 아리앙
     17 the
     18 Korea
     19 Republic of Korea
     20 Internet
     21 What is this
     22 english
     23 korean
     24 Guten Tak
     25 Guten Morgan
     26 Guten Abent
     27 문서 줄 수 30줄
Apple, a , an 이 사라졌습니다. ^^
여러분은 잘 지워졌나요
이렇게 하시면 됩니다.
u를 누르셔서 다시 세줄을 복원 합니다. ^^
찾기부터 해보겠습니다.
Korea를 찾아 보지요 ^^
/Korea를 입력해보십시오.
      1 대한민국
      2 동해물
      3 백두산
      4 한라산
      5 백록담
      6 천지
      7 서울
      8 대전
      9 대구
     10 부산
     11 하늘
     12 땅
     13 검은색
     14 우리나라
     15 강산
     16 아리앙
     17 Apple
     18 a
     19 an
     20 the
     21 Korea
     22 Republic of Korea
     23 Internet
     24 What is this
     25 english
     26 korean
     27 Guten Tak
     28 Guten Morgan
     29 Guten Abent
     30 문서 줄 수 30줄
~
~
~
?Korea
이렇게 나오고 T.T 저기 커서는 안보이지만 여러분은 커서가 Korea에 와있지요?
다음 찾기는 n 이전 찾기는 N 입니다. 한번 눌러 보십시오.
찾기를 알아 봤으니 바꿔 보겠습니다.
What is this를 How are you 로 바꿔 보시죠 ^^
:%s/What is this/How are you
이렇게 하시면 됩니다.
      1 대한민국
      2 동해물
      3 백두산
      4 한라산
      5 백록담
      6 천지
      7 서울
      8 대전
      9 대구
     10 부산
     11 하늘
     12 땅
     13 검은색
     14 우리나라
     15 강산
     16 아리앙
     17 Apple
     18 a
     19 an
     20 the
     21 Korea
     22 Republic of Korea
     23 Internet
     24 How are you
     25 english
     26 korean
     27 Guten Tak
     28 Guten Morgan
     29 Guten Abent
     30 문서 줄 수 30줄
~
~
~
:%s/What is this/How are you
잘 따라 하셨으면 위와 같이 변경되어 있을 겁니다. ^^
:%s/What is this/How are you/g
위 문서에서는 소용이 없겠지만, /g 옵션을 모든 문서의 내용을 변경 합니다.
그래서 Korea를 Corea로 변경해 보겠습니다.
:%s/Korea/Corea/g
위와 같이 하면 저위에 있는 2개의 Korea가 Corea로 변경 될 겁니다.
      1 대한민국
      2 동해물
      3 백두산
      4 한라산
      5 백록담
      6 천지
      7 서울
      8 대전
      9 대구
     10 부산
     11 하늘
     12 땅
     13 검은색
     14 우리나라
     15 강산
     16 아리앙
     17 Apple
     18 a
     19 an
     20 the
     21 Corea
     22 Republic of Corea
     23 Internet
     24 How are you
     25 english
     26 korean
     27 Guten Tak
     28 Guten Morgan
     29 Guten Abent
     30 문서 줄 수 30줄
~
~
~
음 지금까지 리눅스 기본 관련글을 쓰면서 파일을 만들고,읽고, 목록확인하고, 이동 시키는 명령어는 열심히 알려 드렸습니다. 디렉토리 만들기도 했네요 ^^
위의 글들을 참고 하시면 되겠습니다. ^^
그런데 파일 삭제는 어떻게 할까요?
rm 이라는 명령어를 사용합니다.
RM(1)                                                                                                                                               User Commands                                                                                                                                               RM(1)

NAME
       rm - remove files or directories

SYNOPSIS
       rm [OPTION]... [FILE]...

DESCRIPTION
       This manual page documents the GNU version of rm.  rm removes each specified file.  By default, it does not remove directories.

       If the -I or --interactive=once option is given, and there are more than three files or the -r, -R, or --recursive are given, then rm prompts the user for whether to proceed with the entire operation.  If the response is not affirmative, the entire command is aborted.

       Otherwise, if a file is unwritable, standard input is a terminal, and the -f or --force option is not given, or the -i or --interactive=always option is given, rm prompts the user for whether to remove the file.  If the response is not affirmative, the file is skipped.

OPTIONS
       Remove (unlink) the FILE(s).

       -f, --force
              ignore nonexistent files and arguments, never prompt

       -i     prompt before every removal

       -I     prompt once before removing more than three files, or when removing recursively; less intrusive than -i, while still giving protection against most mistakes

       --interactive[=WHEN]
              prompt according to WHEN: never, once (-I), or always (-i); without WHEN, prompt always

       --one-file-system
              when removing a hierarchy recursively, skip any directory that is on a file system different from that of the corresponding command line argument

       --no-preserve-root
              do not treat '/' specially

       --preserve-root[=all]
              do not remove '/' (default); with 'all', reject any command line argument on a separate device from its parent

       -r, -R, --recursive
              remove directories and their contents recursively

       -d, --dir
              remove empty directories

       -v, --verbose
              explain what is being done

       --help display this help and exit

       --version
              output version information and exit

       By default, rm does not remove directories.  Use the --recursive (-r or -R) option to remove each listed directory, too, along with all of its contents.

       To remove a file whose name starts with a '-', for example '-foo', use one of these commands:

              rm -- -foo

              rm ./-foo

       Note that if you use rm to remove a file, it might be possible to recover some of its contents, given sufficient expertise and/or time.  For greater assurance that the contents are truly unrecoverable, consider using shred.
그런데 무료로 한게 아니고 대부분 돈을 내고 인증서를 샀습니다. 그리고 1년에 한번 갱신하는 형태로 진행을 했습니다.
그런데, Let's Encrypt는 무료이고 3개월에 한번씩 갱신을 해줘야 합니다.
Crontab의 사용법
오늘은 간단한 사용법을 알려 드리고, Crontab 만으로 다른 글을 하나 더 적도록 하겠습니다.
crontab에 스케쥴을 등록해보자.
sudo crontab -e
음 위 명령어를 입력 합니다.
 sudo crontab -e
[sudo] password for talkit:
no crontab for root - using an empty one

Select an editor.  To change later, run 'select-editor'.
  1. /bin/nano        <---- easiest
  2. /usr/bin/vim.tiny
  3. /bin/ed

Choose 1-3 [1]:
crontab 을 처음 수행하면 무슨 편집기로 편집 할꺼냐고 묻습니다.
저희는 vi를 쓸줄 안다고 생각하고 ^^
2번을 선택 합니다. ^^
# Edit this file to introduce tasks to be run by cron.
#
# Each task to run has to be defined through a single line
# indicating with different fields when the task will be run
# and what command to run for the task
#
# To define the time you can provide concrete values for
# minute (m), hour (h), day of month (dom), month (mon),
# and day of week (dow) or use '*' in these fields (for 'any').
#
# Notice that tasks will be started based on the cron's system
# daemon's notion of time and timezones.
#
# Output of the crontab jobs (including errors) is sent through
# email to the user the crontab file belongs to (unless redirected).
#
# For example, you can run a backup of all your user accounts
# at 5 a.m every week with:
# 0 5 * * 1 tar -zcf /var/backups/home.tgz /home/
#
# For more information see the manual pages of crontab(5) and cron(8)
#
# m h  dom mon dow   command
~
~
~
~
위와 같이 나올껍니다.
vi는 계속 알려 드려야 하는데 일단
:$를 입력하시고 엔터 치십시오
그러면 맨 마지막줄로 갈껍니다.
그리고 o 키를 누르신 다음
0 5 * * * /usr/bin/certbot renew --quiet
요렇게 해주면 인증서 만료일이 30일이내면 자동으로 매일 새벽 5시에 인증서를 갱신합니다. 자동 갱신 후에는 다시 30일이 남아야 갱신을 하겠죠 ^^
그런데, 여기서 힌트를 하나 얻어야 합니다.
저 같은경우는 늘 컴퓨터를 켜두는 편이긴 한데 켜두질 않는 경우는 수동으로 하면 되겠지요 ^^
 sudo certbot --nginx -d example.com -d www.example.com
Saving debug log to /var/log/letsencrypt/letsencrypt.log
Plugins selected: Authenticator nginx, Installer nginx
Enter email address (used for urgent renewal and security notices) (Enter 'c' to
cancel):

- - - - - - - - - - - - - - - - - - - - - - - - - - - - - - - - - - - - - - - -
Please read the Terms of Service at
https://letsencrypt.org/documents/LE-SA-v1.3-September-21-2022.pdf. You must
agree in order to register with the ACME server at
https://acme-v02.api.letsencrypt.org/directory
- - - - - - - - - - - - - - - - - - - - - - - - - - - - - - - - - - - - - - - -
(A)gree/(C)ancel: A

- - - - - - - - - - - - - - - - - - - - - - - - - - - - - - - - - - - - - - - -
Would you be willing to share your email address with the Electronic Frontier
Foundation, a founding partner of the Let's Encrypt project and the non-profit
organization that develops Certbot? We'd like to send you email about our work
encrypting the web, EFF news, campaigns, and ways to support digital freedom.
- - - - - - - - - - - - - - - - - - - - - - - - - - - - - - - - - - - - - - - -
(Y)es/(N)o: Y
Obtaining a new certificate
Performing the following challenges:
http-01 challenge for example.com
Waiting for verification...
Challenge failed for domain example.com
http-01 challenge for example.com
Cleaning up challenges
Some challenges have failed.

IMPORTANT NOTES:
 - The following errors were reported by the server:

   Domain: example.com
   Type:   connection
   Detail: 공인아이피: Fetching
   http://example.com/.well-known/acme-challenge/f8kAgZFm0jvoMhu3mbtN5F7IS7B7xcXupFP1XN7C-NU:
   Timeout during connect (likely firewall problem)

   To fix these errors, please make sure that your domain name was
   entered correctly and the DNS A/AAAA record(s) for that domain
   contain(s) the right IP address. Additionally, please check that
   your computer has a publicly routable IP address and that no
   firewalls are preventing the server from communicating with the
   client. If you're using the webroot plugin, you should also verify
   that you are serving files from the webroot path you provided.
 - Your account credentials have been saved in your Certbot
   configuration directory at /etc/letsencrypt. You should make a
   secure backup of this folder now. This configuration directory will
   also contain certificates and private keys obtained by Certbot so
   making regular backups of this folder is ideal.
저는 집에 있는 컴픀터에 SSL인증 중이라서 ^^ 오류가 나네요 T.T 제가 보안 때문에 몇가지 검사를 위해서 서버에 접속을 했는데 접속이 안된답니다. ^^
그래서 저는 IP타임 공유기의 설정을 변경해서 다시 아래 명령어를 수행 했습니다.
 sudo systemctl restart nginx
talkit@ubuntu:~$ sudo certbot --nginx -d example.com
Saving debug log to /var/log/letsencrypt/letsencrypt.log
Plugins selected: Authenticator nginx, Installer nginx
Obtaining a new certificate
Performing the following challenges:
http-01 challenge for example.com
Waiting for verification...
Cleaning up challenges
Deploying Certificate to VirtualHost /etc/nginx/sites-enabled/example.com

Please choose whether or not to redirect HTTP traffic to HTTPS, removing HTTP access.
- - - - - - - - - - - - - - - - - - - - - - - - - - - - - - - - - - - - - - - -
1: No redirect - Make no further changes to the webserver configuration.
2: Redirect - Make all requests redirect to secure HTTPS access. Choose this for
new sites, or if you're confident your site works on HTTPS. You can undo this
change by editing your web server's configuration.
- - - - - - - - - - - - - - - - - - - - - - - - - - - - - - - - - - - - - - - -
Select the appropriate number [1-2] then [enter] (press 'c' to cancel): 2
Redirecting all traffic on port 80 to ssl in /etc/nginx/sites-enabled/example.com

- - - - - - - - - - - - - - - - - - - - - - - - - - - - - - - - - - - - - - - -
Congratulations! You have successfully enabled https://example.com

You should test your configuration at:
https://www.ssllabs.com/ssltest/analyze.html?d=example.com
- - - - - - - - - - - - - - - - - - - - - - - - - - - - - - - - - - - - - - - -

IMPORTANT NOTES:
 - Congratulations! Your certificate and chain have been saved at:
   /etc/letsencrypt/live/example.com/fullchain.pem
   Your key file has been saved at:
   /etc/letsencrypt/live/example.com/privkey.pem
   Your cert will expire on 2023-04-01. To obtain a new or tweaked
   version of this certificate in the future, simply run certbot again
   with the "certonly" option. To non-interactively renew *all* of
   your certificates, run "certbot renew"
 - If you like Certbot, please consider supporting our work by:

   Donating to ISRG / Let's Encrypt:   https://letsencrypt.org/donate
   Donating to EFF:                    https://eff.org/donate-le
위와 같이 성공 했습니다.
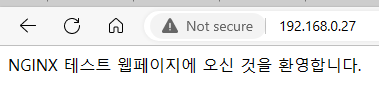
오 ^^
오 저 앞에 Not secure가 없어졌습니다. ^^
이번 글은 여기까지 하고, 다음글에서는 Let's Encrypt의 갱신 자동화에 대해서 글을 또하나 적어보고, 또한 도메인 구매와 도메인 설정(DNS)에 관해서 알아보겠습니다.
# Default server configuration
#
server {
        listen 80 default_server;
        listen [::]:80 default_server;

        root /var/www/html;

        # Add index.php to the list if you are using PHP
        index index.html index.htm index.nginx-debian.html;

        server_name _;

        location / {
                # First attempt to serve request as file, then
                # as directory, then fall back to displaying a 404.
                try_files $uri $uri/ =404;
        }
}
일단 SSL이라든지 여러가지 설정이 주석으로 정의 되어 있습니다만, 주석부분은 대부분 지워 버리면 실제로 위와 같은 결과만 나옵니다. ^^
default 서버는 80번 포트에서 대기 중이구요. /var/www/html 폴더에 html 파일이 있습니다.
그리고 시작 파일은 index.html, index.htm, index.nginx-debian.html 이 시작 파일 입니다.
default를 없애고, example를 만들어 보도록 하겠습니다. 저는 앞으로 여기서 mattermost를 만들어야겠지요 ^^ 아닌가 mattermost는 나중에 ^^
sudo mkdir /var/www/example
example 디렉토리를 웹 홈에 만들구요.
sudo vi /var/www/example/index.html
index.html 파일을 생성 합니다.
리눅스/Linux vi/vim NIX에서 가장 유명한 텍스트 편집기 - 글쓰기. One of the best text editor on NIX fields. - Writing https://talkit.tistory.com/699
위 글을 보시면 vi로 글쓰는 방법이 나와 있습니다. ^^
<html>
<body>
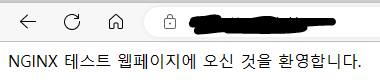
NGINX 테스트 웹페이지에 오신 것을 환영합니다.
<body>
</html>
위 코드를 index.html에 붙여 넣으십시오. 저장하고 나오시면 됩니다.
:wq 안 잃어버리셨죠 ^^
sudo vi /etc/nginx/sites-available/example.com
example.com 블락을 만들기위해서 파일을 하나 만들겠습니다.
server {
listen 80;
root /var/www/example;
index index.html;
server_name 127.0.0.1;
}
sudo systemctl status nginx
● nginx.service - A high performance web server and a reverse proxy server
     Loaded: loaded (/lib/systemd/system/nginx.service; enabled; vendor preset: enabled)
     Active: active (running) since Sun 2023-01-01 00:30:21 PST; 10s ago
       Docs: man:nginx(8)
    Process: 3211 ExecStartPre=/usr/sbin/nginx -t -q -g daemon on; master_process on; (code=exited, status=0/SUCCESS)
    Process: 3212 ExecStart=/usr/sbin/nginx -g daemon on; master_process on; (code=exited, status=0/SUCCESS)
   Main PID: 3213 (nginx)
      Tasks: 17 (limit: 19071)
     Memory: 13.6M
     CGroup: /system.slice/nginx.service
             ├─3213 nginx: master process /usr/sbin/nginx -g daemon on; master_process on;
             ├─3214 nginx: worker process
             ├─3215 nginx: worker process
             ├─3216 nginx: worker process
             ├─3217 nginx: worker process
             ├─3218 nginx: worker process
             ├─3219 nginx: worker process
             ├─3220 nginx: worker process
             ├─3221 nginx: worker process
             ├─3222 nginx: worker process
             ├─3223 nginx: worker process
             ├─3224 nginx: worker process
             ├─3225 nginx: worker process
             ├─3226 nginx: worker process
             ├─3227 nginx: worker process
             ├─3228 nginx: worker process
             └─3229 nginx: worker process

Jan 01 00:30:21 ubuntu systemd[1]: Starting A high performance web server and a reverse proxy server...
Jan 01 00:30:21 ubuntu systemd[1]: Started A high performance web server and a reverse proxy server.
재시작 했으면 상태도 한번 확인해주시고 ^^
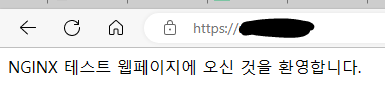
브라우져에서 확인을 하면
저같은 경우는 위와 같이 나옵니다. ^^
잘 만들어서 잘 구동이 되고 있네요 ^^
오늘은 여기까지 하겠습니다. 제 목표는 저기 Not secure 없애는 거여서 다음글 또는 그 다음 글에서 아마 가능 할 것으로 생각 됩니다. ^^
이번에 적으려고 하는 NGINX도 웹서버의 일종입니다. Apache 보다는 좀 더 뒤에 나온 제품이어서 좀 더 신선한 기능들을 제공하긴 하지만, 서로 경쟁 관계여서 요즘은 NGINX가 좀 더 점유율을 가져가고 있다고 알고 있습니다. ^^ 서로를 보고 보완을 하고 있는 것으로 알고 있습니다.
W3Techs - extensive and reliable web technology surveys 출처 : https://w3techs.com/
[무료소프트웨어] 무료 보안쉘 클라이언트 PuTTY 최신 버전 다운로드 및 설치하기. How to Install the latest version PuTTY that is free Secure Shell Client. https://talkit.tistory.com/674
리눅스에 접속하시는 방법은 위 글들에서 설명해 두었습니다. 참고해서 접속하시면 될 것 같습니다.
리눅스에 NGINX 설치
저는 계속 Putty러 접속을 합니다.
여러분들이 VMWARE에 우분투를 설치하셨거나, 우분투 리눅스 VPS를 하나 가지고 계시거나 하다는 전제 하에서 이 글은 시작 하고 있습니다.
리눅스에 접속하기
서버에 우선 접속하십시오.
Putty를 여시고 저기 주소에 입력하시거나 아래에 있는 저장된 세션에서 선택해서 접속 하시면 됩니다.
login as: talkit
talkit@192.168.0.27's password:
Welcome to Ubuntu 20.04.5 LTS (GNU/Linux 5.15.0-56-generic x86_64)

 * Documentation:  https://help.ubuntu.com
 * Management:     https://landscape.canonical.com
 * Support:        https://ubuntu.com/advantage

0 updates can be applied immediately.

Your Hardware Enablement Stack (HWE) is supported until April 2025.
Last login: Thu Dec 29 23:51:08 2022 from 192.168.0.3
talkit@ubuntu:~$ ps -ef | grep nginx
talkit      2021    2007  0 23:50 pts/0    00:00:00 grep --color=auto nginx
talkit@ubuntu:~$
저는 잘 접속이 되었구요.
접속해서 ps로 nginx가 없는 것 까지 확인 했습니다. 제가 Mattermost를 설치하면서 nginx도 설치 했거든요 ^^
nginx 설치 이전으로 VMWARE파일을 돌려 놨습니다.
NGINX 설치하기
그 다음 과정을 계속 진행 하겠습니다.
sudo apt update
위 명령어는 옵셔널 이긴 하지만 한번씩 해주는 것이 좋습니다.
sudo apt install nginx
NGINX 설치는 정말 간단합니다. ^^
 sudo apt install nginx
Reading package lists... Done
Building dependency tree
Reading state information... Done
The following additional packages will be installed:
  libnginx-mod-http-image-filter libnginx-mod-http-xslt-filter libnginx-mod-mail libnginx-mod-stream
  nginx-common nginx-core
Suggested packages:
  fcgiwrap nginx-doc
The following NEW packages will be installed:
  libnginx-mod-http-image-filter libnginx-mod-http-xslt-filter libnginx-mod-mail libnginx-mod-stream
  nginx nginx-common nginx-core
0 upgraded, 7 newly installed, 0 to remove and 0 not upgraded.
Need to get 605 kB of archives.
After this operation, 2,141 kB of additional disk space will be used.
Do you want to continue? [Y/n] y
Get:1 http://us.archive.ubuntu.com/ubuntu focal-updates/main amd64 nginx-common all 1.18.0-0ubuntu1.4                                                                                                                                                                                                                        [37.7 kB]
Get:2 http://us.archive.ubuntu.com/ubuntu focal-updates/main amd64 libnginx-mod-http-image-filter amd6                                                                                                                                                                                                                       4 1.18.0-0ubuntu1.4 [14.8 kB]
Get:3 http://us.archive.ubuntu.com/ubuntu focal-updates/main amd64 libnginx-mod-http-xslt-filter amd64                                                                                                                                                                                                                        1.18.0-0ubuntu1.4 [13.0 kB]
Get:4 http://us.archive.ubuntu.com/ubuntu focal-updates/main amd64 libnginx-mod-mail amd64 1.18.0-0ubu                                                                                                                                                                                                                       ntu1.4 [42.9 kB]
Get:5 http://us.archive.ubuntu.com/ubuntu focal-updates/main amd64 libnginx-mod-stream amd64 1.18.0-0u                                                                                                                                                                                                                       buntu1.4 [67.4 kB]
Get:6 http://us.archive.ubuntu.com/ubuntu focal-updates/main amd64 nginx-core amd64 1.18.0-0ubuntu1.4                                                                                                                                                                                                                        [425 kB]
Get:7 http://us.archive.ubuntu.com/ubuntu focal-updates/main amd64 nginx all 1.18.0-0ubuntu1.4 [3,620                                                                                                                                                                                                                        B]
Fetched 605 kB in 2s (293 kB/s)
Preconfiguring packages ...
Selecting previously unselected package nginx-common.
(Reading database ... 160070 files and directories currently installed.)
Preparing to unpack .../0-nginx-common_1.18.0-0ubuntu1.4_all.deb ...
Unpacking nginx-common (1.18.0-0ubuntu1.4) ...
Selecting previously unselected package libnginx-mod-http-image-filter.
Preparing to unpack .../1-libnginx-mod-http-image-filter_1.18.0-0ubuntu1.4_amd64.deb ...
Unpacking libnginx-mod-http-image-filter (1.18.0-0ubuntu1.4) ...
Selecting previously unselected package libnginx-mod-http-xslt-filter.
Preparing to unpack .../2-libnginx-mod-http-xslt-filter_1.18.0-0ubuntu1.4_amd64.deb ...
Unpacking libnginx-mod-http-xslt-filter (1.18.0-0ubuntu1.4) ...
Selecting previously unselected package libnginx-mod-mail.
Preparing to unpack .../3-libnginx-mod-mail_1.18.0-0ubuntu1.4_amd64.deb ...
Unpacking libnginx-mod-mail (1.18.0-0ubuntu1.4) ...
Selecting previously unselected package libnginx-mod-stream.
Preparing to unpack .../4-libnginx-mod-stream_1.18.0-0ubuntu1.4_amd64.deb ...
Unpacking libnginx-mod-stream (1.18.0-0ubuntu1.4) ...
Selecting previously unselected package nginx-core.
Preparing to unpack .../5-nginx-core_1.18.0-0ubuntu1.4_amd64.deb ...
Unpacking nginx-core (1.18.0-0ubuntu1.4) ...
Selecting previously unselected package nginx.
Preparing to unpack .../6-nginx_1.18.0-0ubuntu1.4_all.deb ...
Unpacking nginx (1.18.0-0ubuntu1.4) ...
Setting up nginx-common (1.18.0-0ubuntu1.4) ...
Created symlink /etc/systemd/system/multi-user.target.wants/nginx.service → /lib/systemd/system/nginx.                                                                                                                                                                                                                       service.
Setting up libnginx-mod-http-xslt-filter (1.18.0-0ubuntu1.4) ...
Setting up libnginx-mod-mail (1.18.0-0ubuntu1.4) ...
Setting up libnginx-mod-http-image-filter (1.18.0-0ubuntu1.4) ...
Setting up libnginx-mod-stream (1.18.0-0ubuntu1.4) ...
Setting up nginx-core (1.18.0-0ubuntu1.4) ...
Setting up nginx (1.18.0-0ubuntu1.4) ...
Processing triggers for systemd (245.4-4ubuntu3.19) ...
Processing triggers for man-db (2.9.1-1) ...
Processing triggers for ufw (0.36-6ubuntu1) ...
talkit@ubuntu:~$
중간에 Y 한번만 눌러 주시면 됩니다.
 sudo systemctl status nginx
● nginx.service - A high performance web server and a reverse proxy server
     Loaded: loaded (/lib/systemd/system/nginx.service; enabled; vendor preset: enabled)
     Active: active (running) since Sat 2022-12-31 23:56:28 PST; 51s ago
       Docs: man:nginx(8)
   Main PID: 2701 (nginx)
      Tasks: 17 (limit: 19071)
     Memory: 13.8M
     CGroup: /system.slice/nginx.service
             ├─2701 nginx: master process /usr/sbin/nginx -g daemon on; master_process on;
             ├─2702 nginx: worker process
             ├─2703 nginx: worker process
             ├─2704 nginx: worker process
             ├─2705 nginx: worker process
             ├─2706 nginx: worker process
             ├─2707 nginx: worker process
             ├─2708 nginx: worker process
             ├─2709 nginx: worker process
             ├─2710 nginx: worker process
             ├─2711 nginx: worker process
             ├─2712 nginx: worker process
             ├─2713 nginx: worker process
             ├─2714 nginx: worker process
             ├─2715 nginx: worker process
             ├─2716 nginx: worker process
             └─2717 nginx: worker process

Dec 31 23:56:28 ubuntu systemd[1]: Starting A high performance web server and a reverse proxy server...
Dec 31 23:56:28 ubuntu systemd[1]: Started A high performance web server and a reverse proxy server.
리눅스 서비스를 확인하면 이미 nginx가 활성화 되어 있는 상태 입니다. ^^
방화벽 설정 - 생략
방화벽 관련 설정도 있지만 방화벽 설정은 안해서 ^^
웹서버에 브라우져로 접속해 보기
웹서버가 켜져 있는걸 확인 했으니까 브라우져로 접속을 해보겠습니다.
Welcome to nginx!
If you see this page, the nginx web server is successfully installed and working. Further configuration is required.

For online documentation and support please refer to nginx.org.
Commercial support is available at nginx.com.

Thank you for using nginx.
vi를 전문적으로 다룰 것이 아니어서 일단, 파일을 열고 또는 새파일을 만들고, 저장하고, 편집하기 위한 명령어들을 알려 드리겠습니다.
일반적으로 윈도우즈의 편집기들은 문장의 줄이나 칸을 이동할때 화살표키를 이용합니다.
그런데, vi는 화살표가 되는 버전도 있지만 전통 적으로는 다른 키를 이용 합니다.
k - 위로 이동(↑)
j - 아래로 이동(↓)
l - 우측으로 이동(→)
h - 좌측으로 이동(←)
화살표로도 가능 합니다. 그런데 사용하시다 보면, hjkl의 조합이 얼마나 편한지 느껴 지실 겁니다. ^^
이유는 화살표키로 가지 않아도 바로 이동할 수 있기 때문입니다.
vi 모드를 익히셔야 합니다.
여러가지 모드가 있는 것으로 알고 있는데 저는 두가지만 설명 드리겠습니다.
Esc 모드와 INSERT 모드 입니다.
Esc 모드 - 모든 작업을 하다가 <Esc>키를 누르면 Esc 모드로 이동한다. 검색이나, 이동등을 위한 모드 이다.
INSERT 모드 - <i><o><O>키 중 하나를 누르면 사용가능한 편집 모드 입니다.
             <i> - 입력한 자리 부터 편집을 할 수 있다.
             <o> - 입력한 자리 한줄 아래에 새로운 줄을 만들고 편집을 할 수 있다.
             <O> - 입력한 자리 한줄 위에 새로운 줄을 만들고 편집을 할 수 있다.

언제든지 <Esc>키를 누르면 Esc 모드로 이동한다.
Esc 모드에서 제가 사용하는 법을 바로 보여 드리겠습니다.
위 동영상에서 잘 보실 수 있을 겁니다. 그리고 실제로 해보시기를 권합니다. ^^
글의 주제가 글을 쓰는 주제라서 이제 글쓰기를 알려 드리겠습니다.
동해물과 백두산이 마르고 닳도록
하느님이 보우하사 우리나라 만세
무궁화 삼천리 화려강산
대한 사람 대한으로 길이 보전하세
자 이제 실제로 한번 vi 로 입력해 보겠습니다. 내용은 애국가 1절 위의 내용을 입력하시는 걸로 하겠습니다. ^^
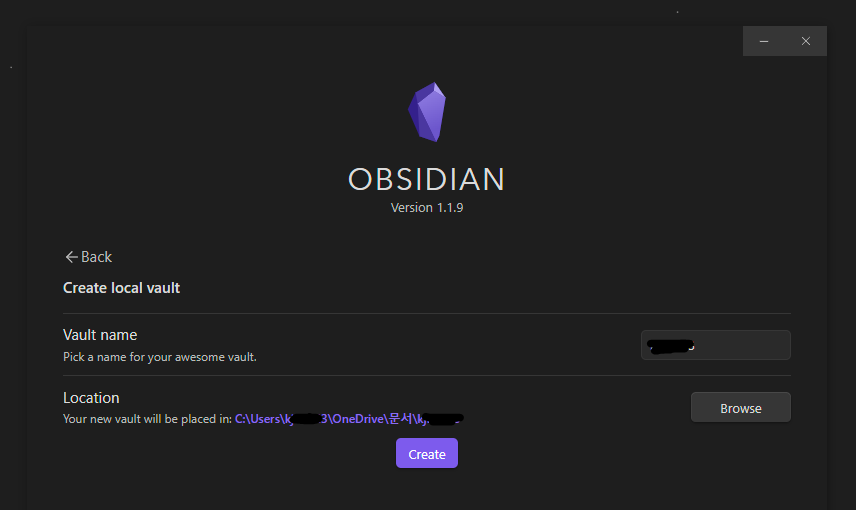
vi 애국가.txt
애국가 파일을 만들겠습니다.
하면 빈 파일의 애국가.txt가 만들어지고 Esc 모드로 있을 겁니다.
우리는 INSERT 모드로 변경을 해야 합니다.
위에서 <i>를 누르면 현재 위치에서 편집을 할 수 있는 모드로 간다고 했습니다.
동상이 잘 안만들어 지네요 T.T 위에는 잘 만들어 졌는데 말이죠.
그럼 해보겠습니다.
일단 애국가.txt가 없다고 생각하고
위 명령어를 리눅스 쉘상에서 내려 주십시오.
<i>키를 입력하고 애국가 1절을 입력해보십시오.
위의 글을 복사하셔서 <i> 키 누르고 마우스 오른쪽 키를 누르셔도 됩니다.
연습해보신다고 생각하셔 하나하나 치셔도 됩니다.
방법은 어떻게든 애국가 1절을 모두 입력해 보십시오 ^^
그리고, 모두 입력 하셨으면 Esc 모드로 빠져 나가기위해서 <Esc>키를 누르시고
:wq 를 입력합니다.
제가 가끔 설명하면서 쳤던 그 명령어입니다.
w가 쓰기 q가 문서 나가기 입니다. ^^
그러면 최초로(?) 리눅스에서 문서를 하나 만드셨네요. 물론 최초는 아시겠지만요.
이제 만드셨으면, 2절을 입력해 보겠습니다. 추가로요 ^^
남산 위에 저 소나무 철갑을 두른 듯
바람 서리 불변함은 우리 기상일세
무궁화 삼천리 화려강산
대한 사람 대한으로 길이 보전하세
2절을 vi에서 입력하기 위해서 또 여셔야겠지요 ^^
vi 애국가.txt
명령어는 동일 합니다.
다른점은 여셨을때 비어 있었다면, 지금은 1절이 입력 되어 있습니다.
자 화살표 키로 입력 하셔도 되겠지만 hjkl을 이용해서 맨 마지막줄로 이동해 주십시오
동해물과 백두산이 마르고 닳도록
하느님이 보우하사 우리나라 만세
무궁화 삼천리 화려강산
대한 사람 대한으로 길이 보전하세
~
~
~
~
~
아까 잘 따라 하셨으면 vi로 열었을때 저정도가 나올껍니다. 내용은 솔직히 애국가 1절이 아니어도 상관 없습니다.
j 4번 누르셨나요?
방법은 두가지 입니다. i를 누르시고 화살표로 맨 마지막으로 이동하신 다음에 엔터를 친다. 이게 첫번째 방법이고
소문자 o키를 누른다가 두번째 방법입니다. 왜냐면 저기 보전하세 다음 줄에 ^^ 넣어야 하니까요.
한글일때는 당황하지 마시고 한영키를 누르셔서 o키를 누르시면 됩니다. ^^
엔터를 한번 치겠습니다. 1절과 구분하기 위해서 요
동해물과 백두산이 마르고 닳도록
하느님이 보우하사 우리나라 만세
무궁화 삼천리 화려강산
대한 사람 대한으로 길이 보전하세

남산 위에 저 소나무 철갑을 두른 듯
바람 서리 불변함은 우리 기상일세
무궁화 삼천리 화려강산
대한 사람 대한으로 길이 보전하세
~
~
~
~
~
~
~
아마도 여러분의 화면에는 이 비슷한 화면이 떠 있을 겁니다.
그럼 이제 저장하고 나가 보십시오.
<Esc> 누르고, :wq 누르셨지요?
이 기상과 이 맘으로 충성을 다하여
괴로우나 즐거우나 나라 사랑하세
무궁화 삼천리 화려강산
대한 사람 대한으로 길이 보전하세
이번에는 동일한 과정을 거쳐서 4절을 입력해보겠습니다.
동해물과 백두산이 마르고 닳도록
하느님이 보우하사 우리나라 만세
무궁화 삼천리 화려강산
대한 사람 대한으로 길이 보전하세

남산 위에 저 소나무 철갑을 두른 듯
바람 서리 불변함은 우리 기상일세
무궁화 삼천리 화려강산
대한 사람 대한으로 길이 보전하세

이 기상과 이 맘으로 충성을 다하여
괴로우나 즐거우나 나라 사랑하세
무궁화 삼천리 화려강산
대한 사람 대한으로 길이 보전하세
~
~
~
~
~
~
~
~
~
설명은 일부러 안드렸습니다. 잘 따라 하셨을 꺼라고 생각 됩니다. ^^
오늘 위에서 설명 드린 것은 다 설명 드리고 끝내려고 합니다. ^^
제가 일부러 이렇게 했습니다. ^^
1절
2절
4절
이 있네요 앗 3절을 입력을 안했습니다.
중간에 끼워 넣으면 되지요 너무 걱정 안하셔도 됩니다. ^^
가을 하늘 공활한데 높고 구름 없이
밝은 달은 우리 가슴 일편단심일세
무궁화 삼천리 화려강산
대한 사람 대한으로 길이 보전하세
자 어떻게 해야 할까요?
방법은 여기서도 2가지 정도가 있습니다.
첫번째로 hjkl을 잘 이용해서 2절의 마지막 보전하세 가 있는 줄로 갑니다.
그리고 소문자 o키를 누르시면 됩니다. ^^ 이게 첫번째구요.
여기서 대문자 O도 사용하셔야지요 ^^
2절의 보전하세 다음줄로 갑니다. ^^ 빈줄이죠 ^^
빈줄에서 대문자 O를 눌러 보십시오.
비디오 녹화를 잘 익혀서 ^^ 이런건 비디로로 보여 드리면 좋을 것 같습니다. ^^
동해물과 백두산이 마르고 닳도록
하느님이 보우하사 우리나라 만세
무궁화 삼천리 화려강산
대한 사람 대한으로 길이 보전하세

남산 위에 저 소나무 철갑을 두른 듯
바람 서리 불변함은 우리 기상일세
무궁화 삼천리 화려강산
대한 사람 대한으로 길이 보전하세

가을 하늘 공활한데 높고 구름 없이
밝은 달은 우리 가슴 일편단심일세
무궁화 삼천리 화려강산
대한 사람 대한으로 길이 보전하세

이 기상과 이 맘으로 충성을 다하여
괴로우나 즐거우나 나라 사랑하세
무궁화 삼천리 화려강산
대한 사람 대한으로 길이 보전하세
~
~
~
~
~
~
~
여기까지 잘 따라 하셨을 것으로 믿습니다.
오늘은 글쓰기 였고, 입력만 있는 글 쓰기였습니다. 다음 vi에서는 글을 수정하는 방법을 알려드리겠습니다.
지금도 일종의 수정을 하셨지만, 줄을 지우거나, ^^ 글자를 지우기도 해야 하지 않겠습니까 ^^
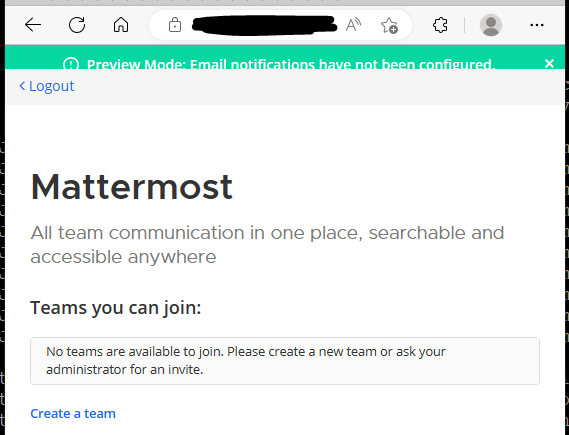
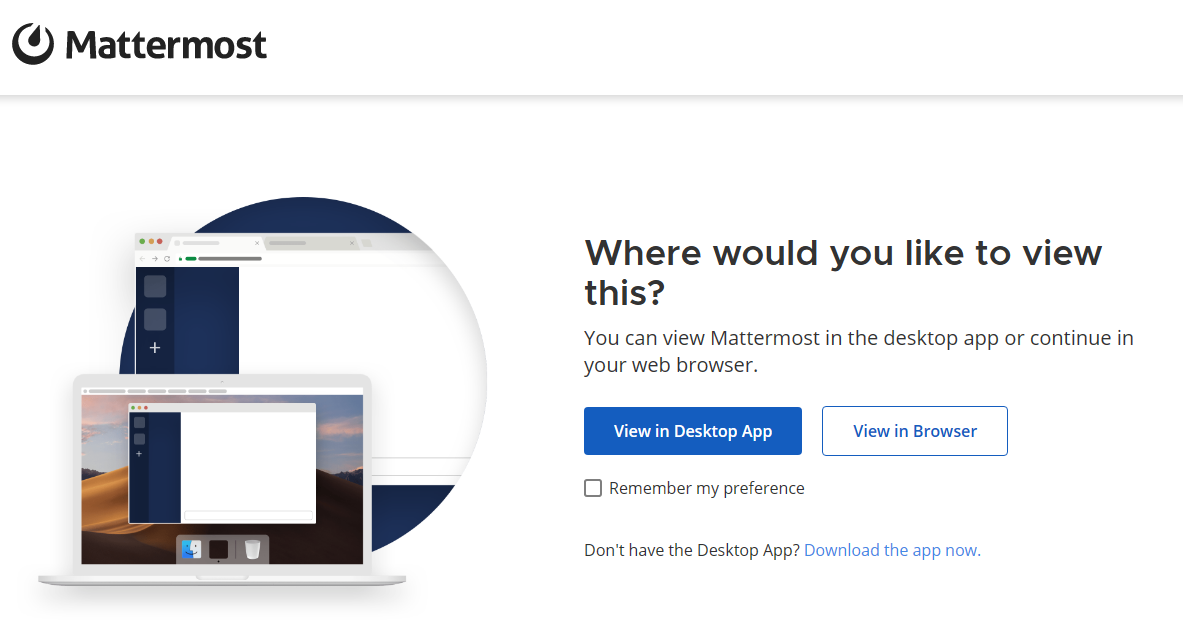
이번 글에서는 제가 지난 번에 리눅스를 설치 하면서 뭔가를 설치해보고자한다고 말씀 드렸는데 그것 중에 하나가 Mattermost라는 툴입니다.
이툴은 Slack이라는 협업도구(?)를 대체하는 프로그램 입니다.
Mattermost는 Slack과 마찬가지로, 웹사이트에서 가입해서 사용할 수 있습니다.
하지만, Slack과는 다르게 Self-managed server를 제공 합니다.
그래서 저는 테스트 겸 제가 셋팅해 놓은 VMWARE ubuntu에 그리고 궁극적으로 외부의 VPS에 설치하고자 합니다.
Mattermost 설치전으로 되돌릴수 있도록 백업을 하고 있습니다. ^^
zip파일로 VM폴더를 묶어 두면 나중에 복원하거나 다른 것을 해볼 때 사용 가능 합니다.
이부분은 다음에 VMWARE 백업 이라는 주제로 한번 글을 써보겠습니다.
오늘은 Mattermost 설치에 주안점을 두겠습니다.
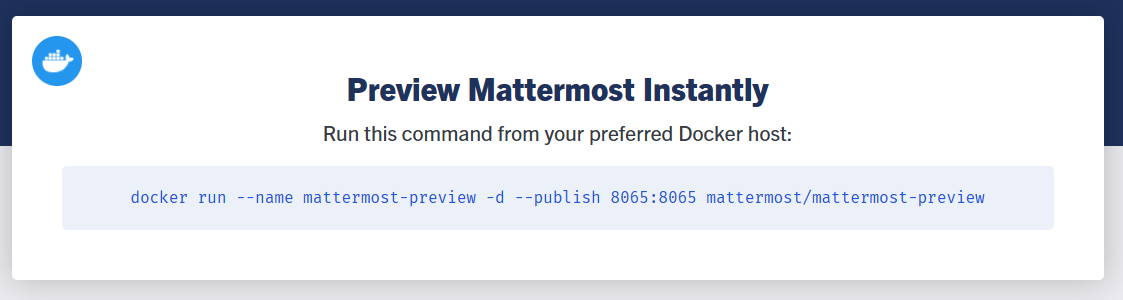
Mattermost 공식 홈페이지에는 기본적으로 docker를 이용해서 설치하고 사용하는 법을 알려 주고 있습니다. 그런데 제가 docker잘 모릅니다. T.T
그래서 일단 Ubuntu에 직접 설치하는 것을 생각하고 있습니다.
순서를 조금 요약해보겠습니다.
1. Ubuntu 설치
2. Database 설치
3. Mattermost server 프로그램 설치
4. Mattermost server 프로그램 설정
5. Mattermost server 상에 TLS 설정
6. NGINX server 설치
7. Mattermost server를 위한 proxy로 NGINX 설정
8. SSL과 HTTP/2와 함께 NGINX 설정


